- Products ProductsLocation Services
Solve complex location problems from geofencing to custom routing
PlatformCloud environments for location-centric solution development, data exchange and visualization
Tracking & PositioningFast and accurate tracking and positioning of people and devices, indoors or outdoors
APIs & SDKsEasy to use, scaleable and flexible tools to get going quickly
Developer EcosystemsAccess Location Services on your favorite developer platform ecosystem
- Documentation DocumentationOverview OverviewServices ServicesApplications ApplicationsDevelopment Enablers Development EnablersContent ContentHERE Studio HERE StudioHERE Workspace HERE WorkspaceHERE Marketplace HERE MarketplacePlatform Foundation and Policy Documents Platform Foundation and Policy Documents
- Pricing
- Resources ResourcesTutorials TutorialsExamples ExamplesBlog & Release Announcements Blog & Release AnnouncementsChangelog ChangelogDeveloper Newsletter Developer NewsletterKnowledge Base Knowledge BaseFeature List Feature ListSupport Plans Support PlansSystem Status System StatusLocation Services Coverage Information Location Services Coverage InformationSample Map Data for Students Sample Map Data for Students
- Help
Tutorial: Integrate a HERE map into Android Auto
This tutorial shows how a MapView can be rendered in your car's infotainment display with Android Auto. Android Auto is an app on its own that is installed on the actual hardware of a car. It can be simulated using a Desktop Head Unit (DHU) app running on your development machine.
The integration with proprietary Android Automotive solutions is not covered here, but follows the same principles as shown in these Android example apps.
Setting up a DHU can be a time-consuming task, so it is recommended to test your local setup with the official Android example apps from the aforementioned car-app-library.
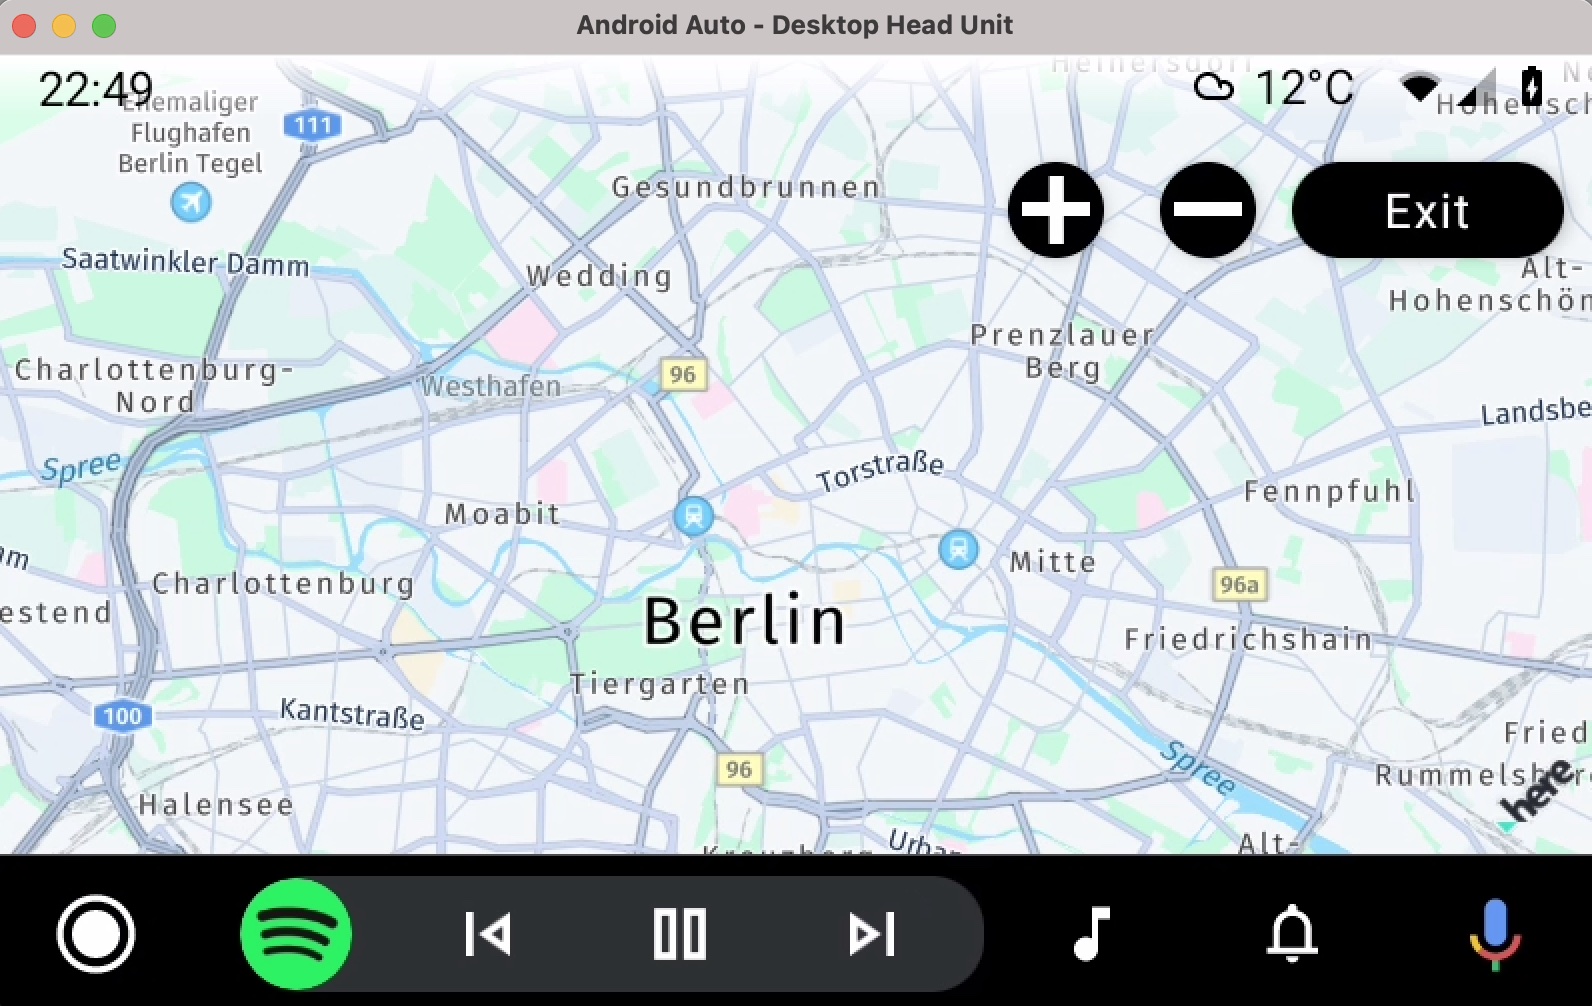
The resulting app of this tutorial will show the MapView instance on a DHU with a zoom-in button (+) and a zoom-out (-) button. Another MapView instance will be shown on the screen of the mobile device that is connected to the DHU. The finished HelloMapAndroidAuto example app can be found on GitHub.
Note
Android Auto is only compatible with phones running Android 6.0 (API level 23) or higher.
Step 1 - Set up Android Auto and the Desktop Head Unit (DHU)
For this step, please follow the official documentation from Android Auto.
In essence:
- Install Google Play Services on your mobile test device or make sure you have the latest version.
- On your mobile device, go to the Play Store and make sure you have the latest Android Auto app installed. On Samsung devices - or when you don't find Android Auto on your device: Go to the
Settingsapp and search for "Android Auto". - On your mobile device, enable the Android Developer Settings for both device and the Android Auto app: https://developer.android.com/studio/debug/dev-options.
- On your mobile device, enable Unknown Sources in the Android Auto app: https://developer.android.com/training/cars/testing#step1
- Install DHU on your development machine. We have used DHU 1.1 for testing.
- Run the the DHU and install the Android Auto example apps to see if your setup is working.
Make sure to use a real mobile device for testing and run the DHU on your computer. Do not use an emulator for testing.
How to start testing:
- Attach your device to your computer via USB.
- In the Android Auto app make sure the Android Head Unit Server is started: Search in Settings app for "Android Auto" and click "Start head unit server". A toast message appears: "Starting head unit server ... ".
- Open a command line window and change the directory to the installation of Android Auto, for example:
cd /Users/yourname/Library/Android/sdk/extras/google/auto - Type
adb kill-serverto reset any ongoing session. - Type
adb forward tcp:5277 tcp:5277to connect your device with ADB. You should see a message that the "daemon started successfully at tcp:5037" or similar. - Now start the DHU by typing:
./desktop-head-unit. - Wait a few seconds. The screen may stay black. Watch permission prompts on your device and DHU - if shown. Repeat all above steps if it does not work.
- A separate window appears showing the DHU with all installed Android Auto apps.
- You can quit a session by typing
quit. Don't forget to also call "Stop head unit server" on your device.
Note
When you do this for the first time, make sure to go through the setup process on device and DHU. A lot of licenses and permissions need to be accepted. If still something does not work, look at the Troubleshooting section below.
When you are successful, you can see a few Android Auto apps running in the DHU. To test your own app, deploy it onto the device via USB/ADB - and the device's screen and the DHU's screen should be updated automatically.
Note
You cannot test your Android Auto apps in-car on a real head unit, unless you have them already distributed through the Google Play Store. See also this note from Google.
Step 2 - Integrate Android Auto into an existing app
For this tutorial, we use the HelloMap app you can find on GitHub. By default, it shows a MapView on the device. Now we want to extend this app to show a second instance of the MapView on a DHU. For this, we need to integrate Android Auto.
Note
The resulting app is only meant for testing purposes. For a production-ready app, make sure to follow the Android Auto guidelines to see how to design an app that is relevant to the car environment.
Make sure the minSdkVersion Version is set to 23 or higher in the app's build.gradle file as Android Auto is only supported on Android 6.0 or higher:
minSdkVersion 23
In the same file, integrate Android Auto in the dependencies closure:
dependencies {
    ...
    implementation "androidx.car.app:app:1.2.0-rc01"
}
In the AndroidManifest file, add the following required permissions:
<!-- Declare Android Auto specific permissions. -->
<uses-permission android:name="androidx.car.app.ACCESS_SURFACE"/>
<uses-permission android:name="androidx.car.app.NAVIGATION_TEMPLATES"/>
In the same file, add the following to the application tag:
<!-- Declare the CarAppService for use with Android Auto. -->
<service
    android:name="com.here.hellomapandroidauto.HelloMapCarAppService"
    android:exported="true">
    <intent-filter>
        <action android:name="androidx.car.app.CarAppService"/>
        <category android:name="androidx.car.app.category.NAVIGATION"/>
    </intent-filter>
</service>

<!-- Declare the Android Auto API Level and layout template. -->
<meta-data
    android:name="androidx.car.app.minCarApiLevel"
    android:value="1"/>
<meta-data
    android:name="com.google.android.gms.car.application"
    android:resource="@xml/automotive_app_desc"
    tools:ignore="MetadataTagInsideApplicationTag"/>
Adapt the path and class name (com.here.hellomapandroidauto.HelloMapCarAppService) according to your own app. We will create the HelloMapCarAppService class below - as well as the required automotive_app_desc.xml template. For our example, this file has only this content:
<?xml version="1.0" encoding="utf-8"?>

<automotiveApp>
    <uses name="template" />
</automotiveApp>
Create a new "xml" folder and add the file: app/src/main/res/xml/automotive_app_desc.xml.
Now create the HelloMapCarAppService Java class / file. Note, you can also use Kotlin, if you prefer. Here we use Java:
package com.here.hellomapandroidauto;

import android.content.Intent;
import android.content.pm.ApplicationInfo;

import androidx.annotation.NonNull;
import androidx.annotation.Nullable;
import androidx.car.app.CarAppService;
import androidx.car.app.Screen;
import androidx.car.app.Session;
import androidx.car.app.validation.HostValidator;

/**
 * Entry point for the hello map app.
 *
 * <p>{@link CarAppService} is the main interface between the app and the car host. For more
 * details, see the <a href="https://developer.android.com/training/cars/apps">Android for
 * Cars Library developer guide</a>.
 */
public final class HelloMapCarAppService extends CarAppService {

    public HelloMapCarAppService() {
        // Exported services must have an empty public constructor.
    }

    @Override
    @NonNull
    public Session onCreateSession() {
        return new Session() {
            @Override
            @NonNull
            public Screen onCreateScreen(@Nullable Intent intent) {

                // Ensure the HERE SDK is initialized (if it is not already initialized
                // via MainActivity).
                HereSDKInitializer.run(HelloMapCarAppService.this);

                return new HelloMapScreen(getCarContext());
            }
        };
    }

    @NonNull
    @Override
    public HostValidator createHostValidator() {
        if ((getApplicationInfo().flags & ApplicationInfo.FLAG_DEBUGGABLE) != 0) {
            return HostValidator.ALLOW_ALL_HOSTS_VALIDATOR;
        } else {
            return new HostValidator.Builder(getApplicationContext())
                    .addAllowedHosts(androidx.car.app.R.array.hosts_allowlist_sample)
                    .build();
        }
    }
}
Every Android Auto app needs to extend at least one CarAppService. We use it to show the HelloMapScreen. This is the only screen we want to show on the DHU for this tutorial. For the other parts of this class, refer to the Android Auto documentation: It shows the typical boiler plate code that every CarAppService requires.
As a next step, we create the HelloMapScreen like this:
package com.here.hellomapandroidauto;

import android.util.Log;

import androidx.annotation.NonNull;
import androidx.annotation.Nullable;
import androidx.car.app.AppManager;
import androidx.car.app.CarContext;
import androidx.car.app.Screen;
import androidx.car.app.SurfaceCallback;
import androidx.car.app.SurfaceContainer;
import androidx.car.app.model.Action;
import androidx.car.app.model.ActionStrip;
import androidx.car.app.model.CarIcon;
import androidx.car.app.model.Template;
import androidx.car.app.navigation.model.NavigationTemplate;
import androidx.core.graphics.drawable.IconCompat;

import com.here.sdk.core.GeoCoordinates;
import com.here.sdk.core.Point2D;
import com.here.sdk.core.Size2D;
import com.here.sdk.mapview.MapError;
import com.here.sdk.mapview.MapMeasure;
import com.here.sdk.mapview.MapScene;
import com.here.sdk.mapview.MapScheme;
import com.here.sdk.mapview.MapSurface;

/**
 * A screen that shows a HERE SDK map view.
 *
 * <p>See {@link HelloMapCarAppService} for the app's entry point to the car host.
 */
public class HelloMapScreen extends Screen implements SurfaceCallback {

    private MapSurface mapSurface;
    private CarContext carContext;

    public HelloMapScreen(@NonNull CarContext carContext) {
        super(carContext);
        this.carContext = carContext;

        Log.d("HelloMapScreen", "Register surface callback");
        carContext.getCarService(AppManager.class).setSurfaceCallback(this);

        // Since the MapSurface implements MapViewBase, it behaves like a MapView, except that it
        // renders on the DHU running Android Auto.
        mapSurface = new MapSurface();
    }

    @NonNull
    @Override
    public Template onGetTemplate() {
        CarIcon zoomInIcon = new CarIcon.Builder(
                IconCompat.createWithResource(carContext, R.drawable.plus)).build();
        CarIcon zoomOutIcon = new CarIcon.Builder(
                IconCompat.createWithResource(carContext, R.drawable.minus)).build();

        // Add buttons to zoom in/out the map view and to exit the app.
        ActionStrip.Builder actionStripBuilder = new ActionStrip.Builder();
        actionStripBuilder.addAction(
                new Action.Builder()
                        .setIcon(zoomInIcon)
                        .setOnClickListener(this::zoomIn)
                        .build());
        actionStripBuilder.addAction(
                new Action.Builder()
                        .setIcon(zoomOutIcon)
                        .setOnClickListener(this::zoomOut)
                        .build());
        actionStripBuilder.addAction(
                new Action.Builder()
                        .setTitle("Exit")
                        .setOnClickListener(this::exit)
                        .build());

        NavigationTemplate.Builder builder = new NavigationTemplate.Builder();
        builder.setActionStrip(actionStripBuilder.build());
        return builder.build();
    }

    @Override
    public void onSurfaceAvailable(@NonNull SurfaceContainer surfaceContainer) {
        Log.d("HelloMapScreen", "Received a surface.");
        mapSurface.setSurface(
                carContext,
                surfaceContainer.getSurface(),
                surfaceContainer.getWidth(),
                surfaceContainer.getHeight());

        mapSurface.getMapScene().loadScene(MapScheme.NORMAL_DAY, new MapScene.LoadSceneCallback() {
            @Override
            public void onLoadScene(@Nullable MapError mapError) {
                if (mapError == null) {
                    double distanceInMeters = 1000 * 10;
                    MapMeasure mapMeasureZoom = new MapMeasure(MapMeasure.Kind.DISTANCE, distanceInMeters);
                    mapSurface.getCamera().lookAt(new GeoCoordinates(52.530932, 13.384915), mapMeasureZoom);
                } else {
                    Log.d("HelloMapScreen", "Loading map failed: mapError: " + mapError.name());
                }
            }
        });
    }

    @Override
    public void onSurfaceDestroyed(@NonNull SurfaceContainer surfaceContainer) {
        mapSurface.destroySurface();
    }

    private void zoomIn() {
        double zoomFactor = 2;
        mapSurface.getCamera().zoomBy(zoomFactor, getCenterPoint());
    }

    private void zoomOut() {
        double zoomFactor = 0.5;
        mapSurface.getCamera().zoomBy(zoomFactor, getCenterPoint());
    }

    private void exit() {
        carContext.finishCarApp();
    }

    private Point2D getCenterPoint() {
        Size2D viewport = mapSurface.getViewportSize();
        return new Point2D(viewport.width * 0.5, viewport.height * 0.5);
    }
}
This is the most interesting part of our app. Since we declared our app as service to support Android Auto in our AndroidManifest, it will automatically show the HelloMapScreen on a DHU when installing - or when launching it later via the Android Auto app directly.
In order to render content, an app needs to render to a Surface. For this, every Android Auto screen implements the SurfaceCallback to get notified when the surface is available. For convenience, the HERE SDK provides a MapSurface class that accepts a SurfaceContainer as parameter:
mapSurface.setSurface(
        carContext,
        surfaceContainer.getSurface(),
        surfaceContainer.getWidth(),
        surfaceContainer.getHeight());
Once the app receives a SurfaceContainer from Android Auto, you are ready to go. The HERE SDK's MapSurface behaves like a normal MapView as it implements the MapViewBase interface. In this example, we use it to load a map scene, just like we do in the MainActivity of the same app - basically, we use a MapSurface instance instead of a MapView instance.
Note
The HERE SDK MapSurface provides support for gestures. On top, buttons can be used to interact with the map. Not all cars support touch gestures such as pan movements.
In this example, we use two buttons to interact with the map. We create these buttons with Android Auto's ActionStrip.Builder. In the callback, we perform a basic map interaction to zoom the map:
double zoomFactor = 2;
mapSurface.getCamera().zoomBy(zoomFactor, getCenterPoint());
You can add more buttons to interact with the map, e.g. for panning. However, make sure to follow the Android Auto guidelines to not distract the driver's attention. Note that as an alternative to Android's CarIcon you can also pin images as an overlay to a MapScene with the class MapImageOverlay that allows to show bitmap graphics on top of the map view that do not move, scale or tilt together with the map.
The resulting app looks like this:
Gesture handling
The HERE SDK provides ScrollHandler, ScaleHandler and FlingHandler interfaces. These handlers can be retrieved from the Gestures class by calling their corresponding getters, for example: Gestures.getScaleHandler.
Each handler offers a single method to trigger the gesture handling.:
-
onScroll(float distanceX, float distanceY)pans the map. -
onScale(float focusX, float focusY, float scaleFactor)zooms by a factor around the given point. -
onFling(float velocityX, float velocityY)results in a kinetic move of the given initial velocity.
These handlers are useful for processing gestures when using the MapSurface with Android Auto. Find a usage example in the HelloMapAndroidAuto app on GitHub. An OpenGL ES example can be seen in the HelloMapSurface example app on GitHub: It shows how to render simple shapes on the map view with the help of a RenderListener.
Troubleshooting
Setting up Android Auto (or Android tools in general) for testing can be cumbersome. Here are a few tips that may help you.
- When executing ADB I get "command not found: adb": This means that you have not yet set up Android's ADB in your path variables. ADB is a tool to help you to connect your device from a console terminal with your computer. Below we show an example solution when using Zsh shell on a Mac. First, launch Android's SDK Manager via Tools -> Android -> SDK Manager and check that you have installed the latest Android SDK Platform-Tools. If it is not installed, please install it. The ADB tool is a part of the Android SDK Platform-Tools. Now you need to make ADB known in your shell environment: Run the following command to update your PATH variable using, for example, the
nanoeditor vianano $HOME/.zshrc. Add the below lines and press "control + x" and then "y" to save it. Adjust the example below to your environment. Afterwards, runsource ~/.zshrc.
export PATH=$PATH:~/Library/Android/sdk/platform-tools
export ANDROID_HOME=~/Library/Android/sdk
export PATH="$HOME/.bin:$PATH"
export PATH="~/Library/Android/sdk/platform-tools":$PATH
Where to go next?
In this tutorial, we showed you how to add support for Android Auto to an existing app. Although we run two separate MapView instances - one on the device and one on the head unit, you can handover functionality between the device and the head unit - since both MapView instances run within the same app lifecycle. For example, a user can start route planning on a mobile device at home - then connect the device via USB in-car and start driving (if your app uses the Navigate Edition). The navigation progress can be shown on the car's head unit, while the device can show supportive information like maneuver details.
Make sure to not distract the driver with too much information: So, why not implementing voice controls on top to interact with the app? Some more ideas:
- Add a speed warner assistant, that shows the current valid speed limits on the head's unit display and warns acoustically when you exceed it.
- Show supporting road attribute information for the current road you are driving on.
- Implement an app that shows places information of POIs nearby, like fuel stations, restaurants or sightseeing spots.