- Products ProductsLocation Services
Solve complex location problems from geofencing to custom routing
PlatformCloud environments for location-centric solution development, data exchange and visualization
Tracking & PositioningFast and accurate tracking and positioning of people and devices, indoors or outdoors
APIs & SDKsEasy to use, scaleable and flexible tools to get going quickly
Developer EcosystemsAccess Location Services on your favorite developer platform ecosystem
- Documentation DocumentationOverview OverviewServices ServicesApplications ApplicationsDevelopment Enablers Development EnablersContent ContentHERE Studio HERE StudioHERE Workspace HERE WorkspaceHERE Marketplace HERE MarketplacePlatform Foundation and Policy Documents Platform Foundation and Policy Documents
- Pricing
- Resources ResourcesTutorials TutorialsExamples ExamplesBlog & Release Announcements Blog & Release AnnouncementsChangelog ChangelogDeveloper Newsletter Developer NewsletterKnowledge Base Knowledge BaseFeature List Feature ListSupport Plans Support PlansSystem Status System StatusLocation Services Coverage Information Location Services Coverage InformationSample Map Data for Students Sample Map Data for Students
- Help
Custom map styles
The HERE SDK for Android provides two flexible solutions to customize the map:
- Custom map styles that can be created using a dedicated WYSIWYG editor.
- Custom raster layers that can be loaded on top of map styles from external sources.
If you are looking for predefined map styles, see the Quick Start guide for an introduction: The HERE SDK comes already with a set of pre-configured map styles such as MapStyle.NORMAL_DAY or MapStyle.SATELLITE.
Create and load custom map styles
The most flexible solution to customize the map is to create your own map styles using a configuration file written in the YAML markup format. Such files can be generated with a WYSIWYG map style editor provided by HERE. For login, please use your HERE credentials (access_key_id / access_key_secret).
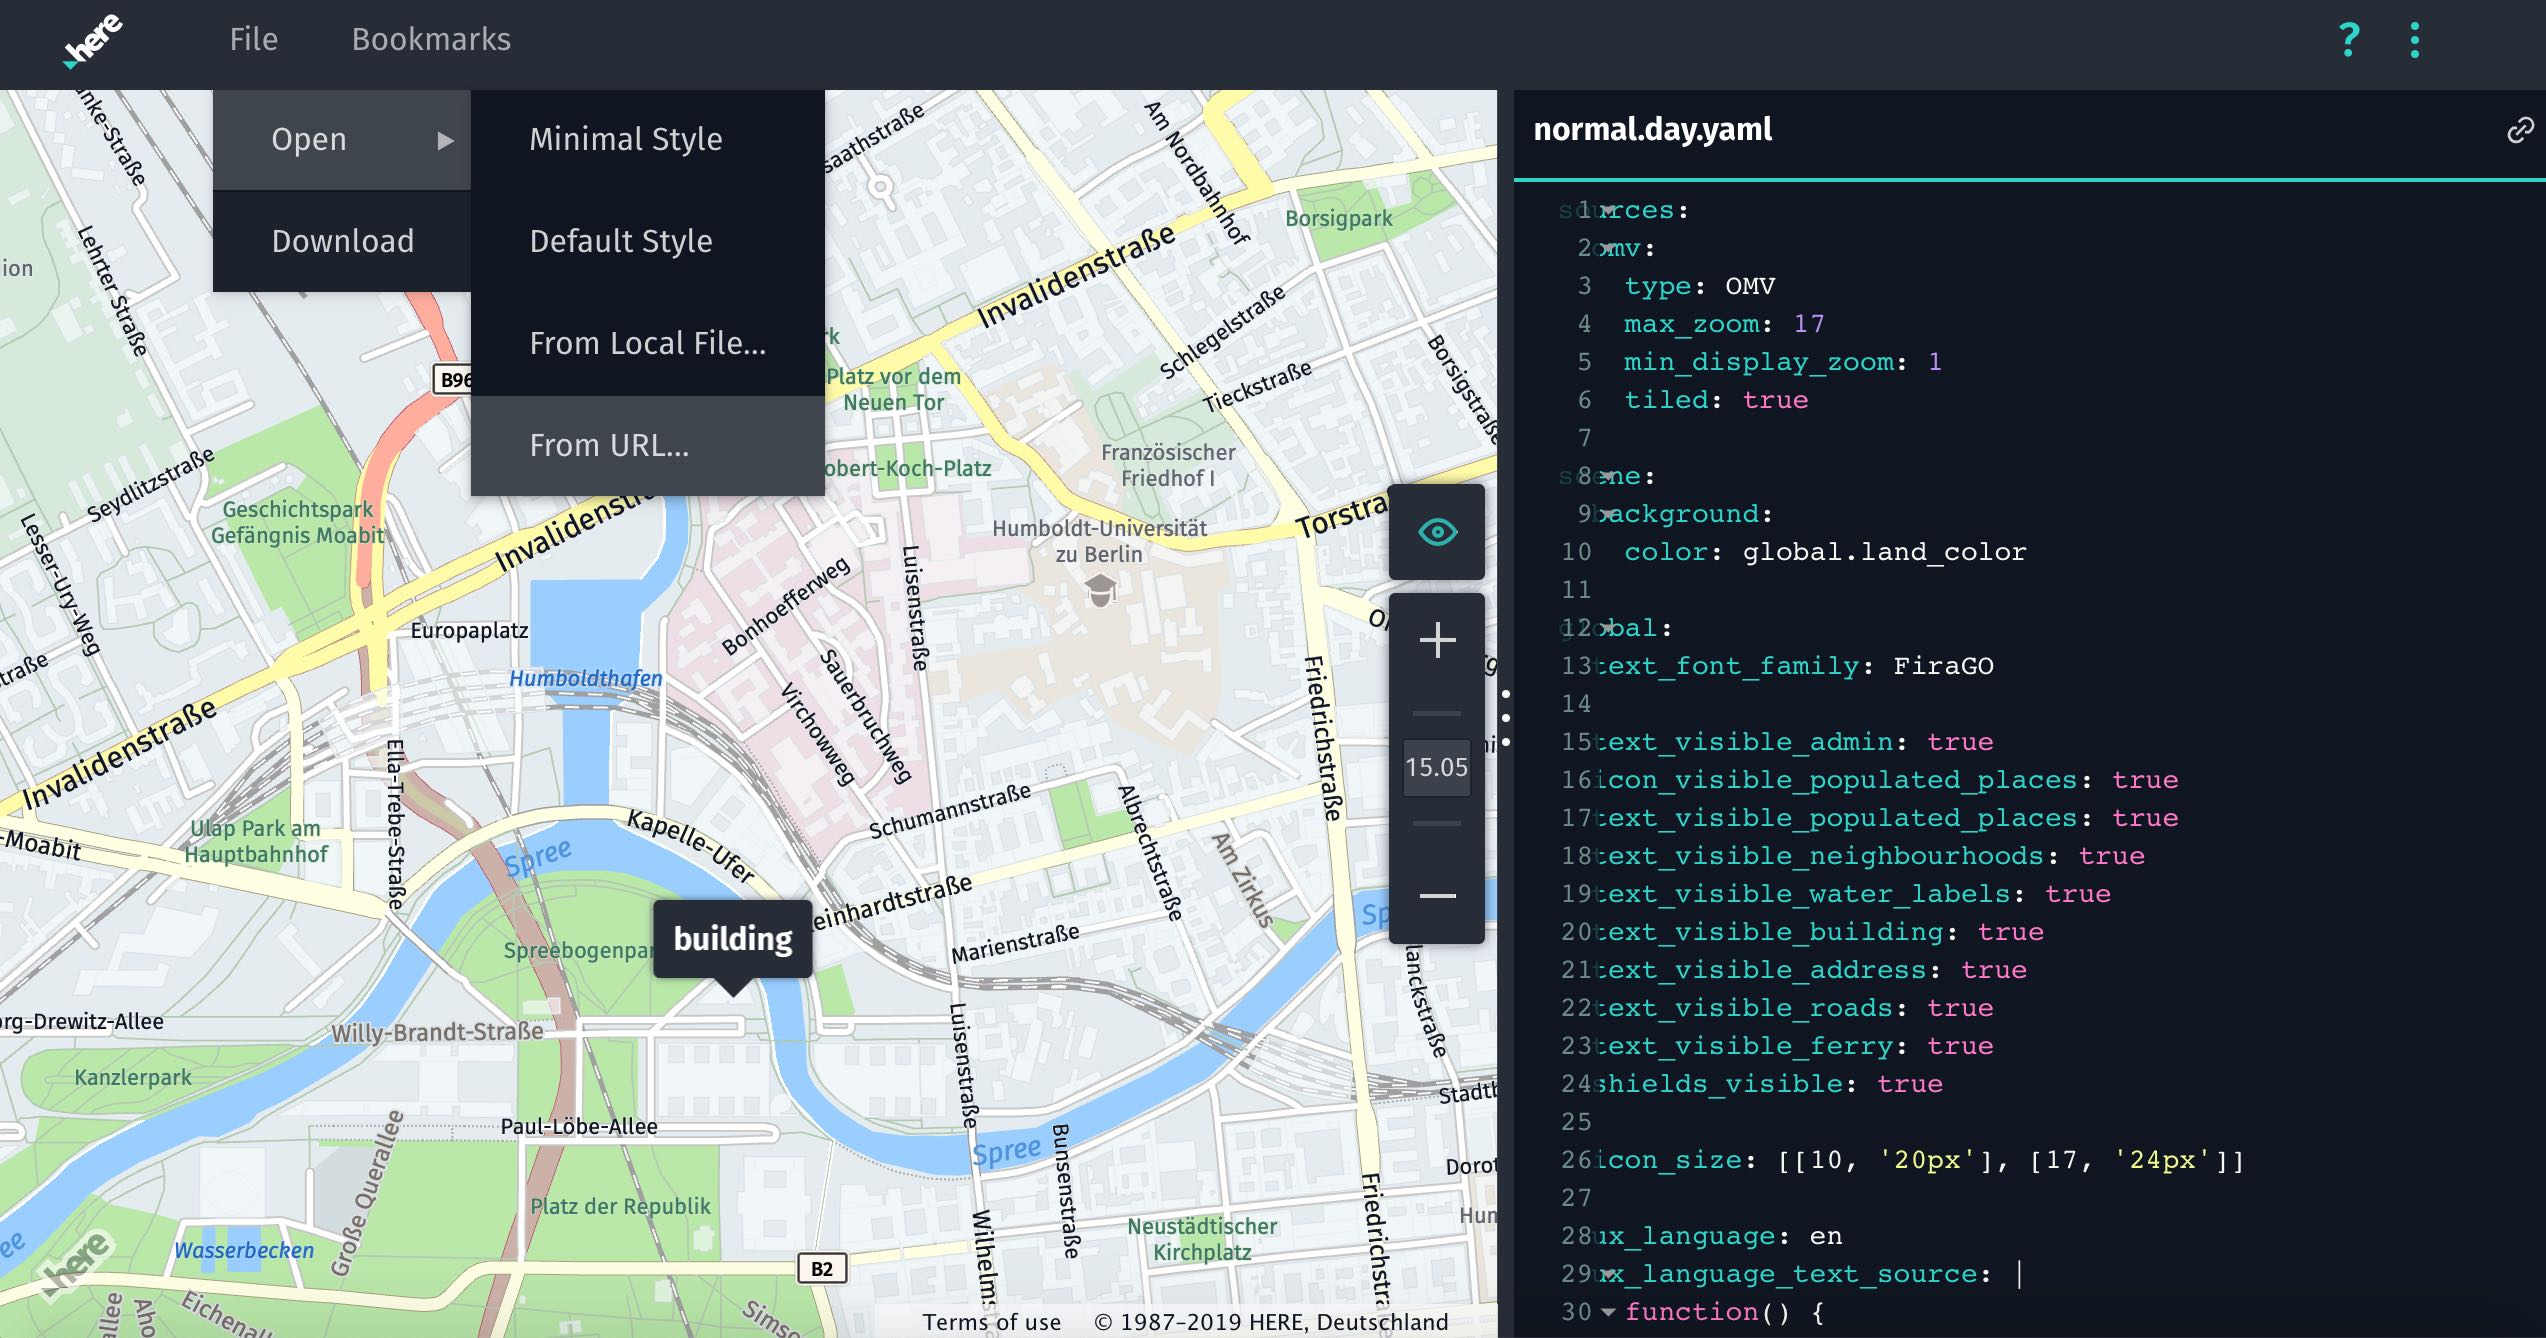
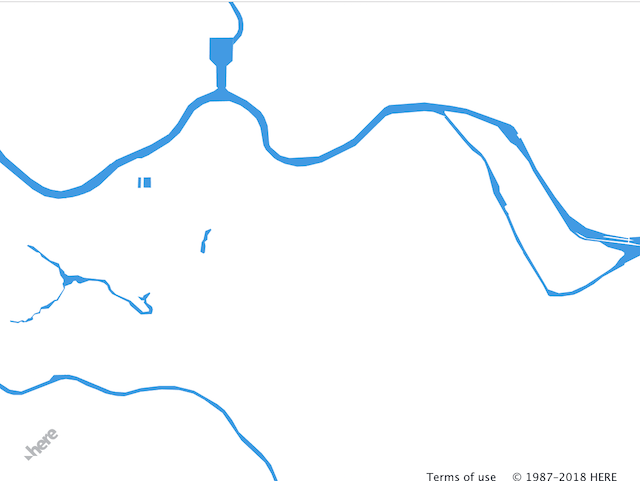
The following example shows a simple map style that defines how to render a water layer provided by the HERE Vector Tile API. For more details on the available layers within the Vector Tile API, please refer to the Layers section of the Vector Tile API documentation.
# Global description of the map. In this example
# the map background color is white.
sources:
  omv:
    type: OMV
scene:
  background:
    color: 'rgb(255, 255, 255)'

# This section contains the style information for the layers
# that are present on the map.
layers:
  # User defined name of the rendering layer.
  water_areas:
    # This section defines where the rendering layer takes
    # its data from. 'source: omv' is mandatory for the Vector Tile API.
    # 'layer: water' specifies what vector layer is taken for rendering.
    data:
      source: omv
      layer: water
    # This section defines how to render the layer.
    draw:
      polygons:
        order: 1 # z-order of the layer
        color: 'rgb(153, 206, 255)'
The map style above defines the map scene's background color and a style named water_areas that describes how to render the OMV data from the Vector Tile API's water layer.
You can paste this custom map style into the map style editor and tweak it as much as you like.
As soon as you are satisfied, save the YAML map style description in a text file and place it into the "assets" directory of your project. If not already added, you can add that folder via Android Studio (Right-click on the project: New -> Folder -> Assets folder). Load the file into a map scene as follows:
private void loadCustomMapScene() {
    // Place the style in to the "assets" directory.
    // Full path example: app/src/main/assets/mapstyle.yaml
    // Adjust file name and path as appropriate for your project.
    String fileName = "mapstyle.yaml";
    AssetManager assetManager = context.getAssets();
    try {
        assetManager.open(fileName);
    } catch (IOException e) {
        Log.e(TAG, "Error: Map style not found!");
        return;
    }

    mapView.getMapScene().loadScene("asset:///" + fileName, new MapScene.LoadSceneCallback() {
        @Override
        public void onLoadScene(@NonNull MapScene.ErrorCode errorCode) {
            if (errorCode != null) {
                Log.d(TAG, "onLoadScene failed: " + errorCode.toString());
            }
        }
    });
}
Since the YAML file needs to be accessed from the HERE SDK, make sure to add the "asset:///"-protocol when passing the file to loadScene(). In the above snippet, we use Android's AssetManager to verify that the file exists at the expected location.
The screenshot below shows how the example YAML map style from above looks on a device.
Using custom map styles can be very effective to differentiate your app from other map applications. Besides, it is possible to change map styles on-the-fly, for example, to shift the user's attention on certain map elements based on the current state of your app. Please keep in mind that enabling too many layers might cause performance drawbacks. In the same way, you can use adapted map styles to improve performance on low-end devices, for example, by disabling extruded buildings.
Note
For more information on how to create custom map styles, refer to the online documentation available from within the map style editor.
Load custom raster layers
Another alternative to customize the map's look is to add your own raster tile service on top of the HERE map styles. This can be your own server where you host tiles that you want to show as an overlay on top of selected areas of the world - or a public tile server such as OpenStreetMap. Fully opaque and transparent map tile overlays are supported. It is also possible to add more than one raster layer to the map at the same time.
The format of the URL should be as follows: https://YourRasterTileService.com/zoom/xTile/yTile.png.
Here, the zoom number represents the map's current zoom level, and xTile and yTile defines the horizontal and vertical tile numbers - as described in the OSM standard style.
Default map gesture actions such as pinch, rotate and zoom behave in the same way for raster tiles as for HERE vector maps - except for a few differences: For example, raster tiles are loaded as bitmaps and therefore a rotated raster map tile rotates all labels and street names contained together with the tile.
Note
When loading a map scene with a custom map style or the default map style, the map will be rendered using vector tiles where the map information is represented as vector data consisting of vertices and paths for better scalability and performance. By contrast, raster tiles are regularly-spaced and square, and consist of bitmap images that represent only pixel information. Note that the satellite map style is also raster based.
Below you can find an example on how to load a custom raster layer on top of a map style:
  String myCustomRasterLayerName = "my_custom_raster_layer";
  long maxZoom = 19;
  long drawOrder = 1000;
  TileServerProvider staticTileServerProvider = new SimpleTileServerProvider("https://a.tile.openstreetmap.org/{z}/{x}/{y}.png");

  RasterLayer rasterLayer = new RasterLayer(
          myCustomRasterLayerName,
          maxZoom,
          drawOrder,
          staticTileServerProvider);

  mapSceneConfig = new MapSceneConfig();
  mapSceneConfig.rasterLayers.add(rasterLayer);
  mapSceneConfig.customMapLayers.put(myCustomRasterLayerName, LayerState.ENABLED);

  mapView.getMapScene().loadScene(MapStyle.EMPTY, mapSceneConfig, new MapScene.LoadSceneCallback() {
      @Override
      public void onLoadScene(@Nullable MapScene.ErrorCode errorCode) {
          if (errorCode != null) {
              Log.d(TAG, "onLoadScene failed: " + errorCode.toString());
          }
      }
  });
SimpleTileServerProvider implements the TileServerProvider interface. You can provide your own implementation if you want to switch the provider at runtime. For example, with this you can use different raster layer sources based on the region in the world. SimpleTileServerProvider is a convenience implementation that sets a static provider.
Above we use the German fork of OpenStreetMap's standard tile layer as RasterLayer which supports zoom levels from 0 to 19. We can also specify the draw order. For that, we simply choose the default value that is used by most HERE SDK map items. By setting a draw order, you can specify if the raster layer should be shown below or above other map items. When choosing the default value of 1000, the raster layer will be drawn on top of the default map styles.
For the example above, we selected MapStyle.EMPTY since the OpenStreetMap tiles are fully opaque - and we don't want to load any other map data while panning. MapStyle.EMPTY simply consists of an empty YAML map style file.
Please note that the LoadSceneCallback will not indicate an error if the URL contains syntax errors or cannot be reached - the first tiles will start loading after the callback is completed and the custom raster layer will be added to the list of known layers. If the custom service does not host tile bitmaps for a certain combination of zoom level and tile numbers, no custom raster tile will be rendered and the specified MapStyle will be visible again.
Note
One of the main advantages of custom raster layers is that you can easily enhance the HERE map styles with a custom tile source on top, for example, to show weather data or any other data you want to see on top of the map. With transparent tiles, this works better. When using an opaque raster tile source, it is recommended to combine this with a raster based map style or an empty map style - as shown in the example above.
Once the scene is loaded, you can control the visibility of the custom raster layer with the following code (here we hide the layer):
try {
    mapView.getMapScene().setLayerState(myCustomRasterLayerName, LayerState.DISABLED);
} catch (MapScene.MapSceneException e) {
    Log.d(TAG, "setLayerState failed: " + e.getMessage());
}
Setting a new layer state is performed synchronously, but it requires a valid map scene that must have been loaded before. Also, setting a new layer state while a new map scene is being loaded, may result in an exception.
By setting a new layer state you can also enable other MapLayer overlays on top of a map style. For example, you can enable a map layer to indicate realtime traffic flows. An example for this can be found in the Traffic section.
Note
Before using a custom tile server in your own app, please make sure to follow the applicable terms & conditions for the tile service of your choice.
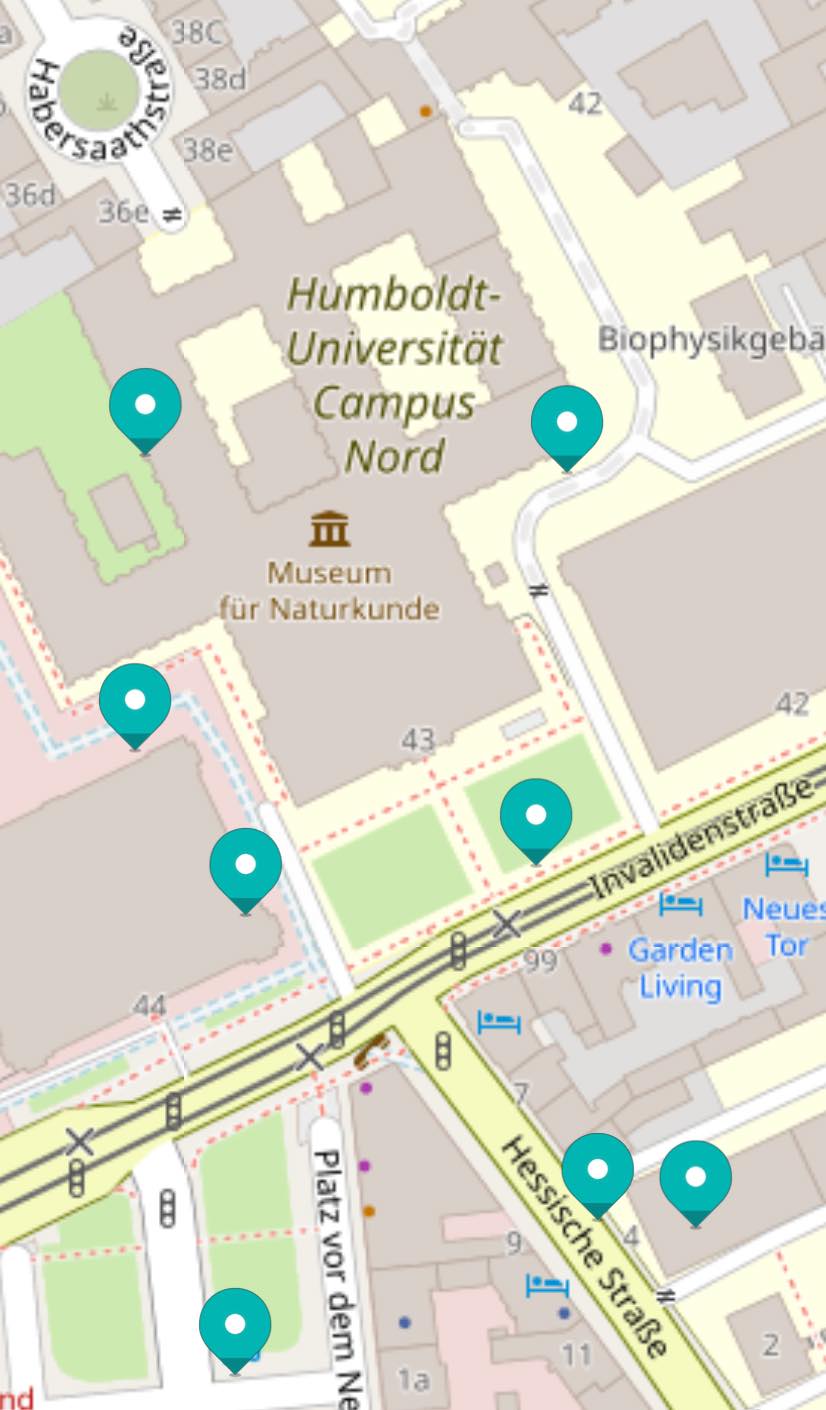
The above screenshot shows that you can easily combine custom raster tiles with other HERE SDK features. For this example, we render several MapMarker instances on top of the tile data from the OpenStreetMap tile server.