- Products ProductsLocation Services
Solve complex location problems from geofencing to custom routing
PlatformCloud environments for location-centric solution development, data exchange and visualization
Tracking & PositioningFast and accurate tracking and positioning of people and devices, indoors or outdoors
APIs & SDKsEasy to use, scaleable and flexible tools to get going quickly
Developer EcosystemsAccess Location Services on your favorite developer platform ecosystem
- Documentation DocumentationOverview OverviewServices ServicesApplications ApplicationsDevelopment Enablers Development EnablersContent ContentHERE Studio HERE StudioHERE Workspace HERE WorkspaceHERE Marketplace HERE MarketplacePlatform Foundation and Policy Documents Platform Foundation and Policy Documents
- Pricing
- Resources ResourcesTutorials TutorialsExamples ExamplesBlog & Release Announcements Blog & Release AnnouncementsChangelog ChangelogDeveloper Newsletter Developer NewsletterKnowledge Base Knowledge BaseFeature List Feature ListSupport Plans Support PlansSystem Status System StatusLocation Services Coverage Information Location Services Coverage InformationSample Map Data for Students Sample Map Data for Students
- Help
Start using your purchased data
Once you have completed your purchase of HERE data, you can use it in your projects. To start using your data, you need to download it to your app using the HERE Command Line Interface (OLP CLI). Follow the steps below to set up a project and download catalogs you subscribed to on the HERE Marketplace:
Note
When you subscribe to HERE Map Layers, a project named My Purchases is created for you automatically with the catalogs you purchased linked to it. Therefore, for HERE Map Layers you may skip creating a project and linking catalogs to it. However, for HERE Map Layers, a maximum of five sub-resources are linked to the My Purchases project by default. Additional sub-resources can be linked manually as described below.
Follow the steps below to complete the minimum setup required to quickly begin using the data you purchased on the HERE Marketplace:
- Install the OLP CLI
- Create a project
- Link the data to your project
- Set up your credentials
- Download all catalog partitions
Install the OLP CLI
Follow the instructions in the Command Line Interface User Guide to install the OLP CLI.
Create a project
To create a project, follow these steps:
- Sign in to the HERE platform using your HERE account.
- Open the Projects manager from the launcher.
- Click Create new project.
- Enter a name for the project. Project names don't have to be unique.
- Enter a project ID. Project IDs must be unique within an organization and cannot be changed for the lifetime of the organization. Project IDs must be between 4 and 16 characters in length.
- Optional: Enter a description.
- Click Save.
Link the data to your project
To access data you have purchased on HERE Marketplace, you need to link it to a project by following these steps:
-
Open the Projects Manager and find the project you created. Notice how the catalogs from the newly-purchased data product are not in the list of catalogs linked to your projects.
-
Click Add catalog and select Link a catalog from the drop-down list.
-
Find the catalog contained in the product you purchased and click Link.
-
Optional: select alternate permissions from the Permissions field.
-
Click Apply. The HERE platform displays a success message banner and the Add catalog button is replaced with a Linked icon.
-
Click Done. The linked catalog appears under the Catalogs section of the Resources tab.
Set up your credentials
To get your credentials, follow these steps:
- Sign in to the HERE platform using your HERE account.
- Select the Access Manager from the launcher.
- Select the Apps tab and click Register new app.
- Enter a name for the app.
- Optional: Enter a description for the app.
- Under New app, select Create.
-
Select the project you created in the previous procedure from the Default access to a project field.
Note
For HERE Map Layers, select the My Purchases project.
-
Click Register. The HERE platform creates a new app with a unique app ID.
- On the Credentials tab, select OAuth 2.0 and then click Create credentials. An access key is created and displayed.
- Click Download to download the
credentials.propertiesfile containing your access key ID and secret. -
Create a default profile by running the following command in the OLP CLI:
olp credentials import default credentials.properties -
Run the following command in the directory that contains the OLP CLI JAR file to verify that your credentials have been correctly configured:
olp api token getOutput similar to the following is returned, confirming that your credentials have been configured correctly:
Token: eyJhbGciOiJSUzUxMiIsImN0eSI6IkpXVCIsImlzcyI6IkhFUkUiLCJhaWQiOiJtekxjYjFyTDhuc2t2RFFwQ0ZFRiIs
ImlhdCI6MTUyMTgwNjYyOCwiZXhwIjoxNTIxODkzMDI4LCJraWQiOiJqMSJ9.ZXlKaGJHY2lPaUprYVhJaUxDSmxibU1pT2lKQk
1qVTJRMEpETFVoVE5URXlJbjAuLmtGc0JMODJibEUxTHhCS1M3MEctcFEuZHhsb2psaklEQmdNVEdoMEFKMHAzUU9yeE9INXdhd
1hkWjVSLS1Kdkc3VFBoUkRWY3owcUFYZ0V2Y3kwOGpMdzBCR09sNjJfZ2pxeUNuLXhET3JtZV8xNUlkV0tJN2VxTUpZNTNJelRx
ZjhUSzdVVHlEUlJFVnBLRW5BN2FvR2MubFViMTNGYWdKMlVGZXVQZnZsVG44Y2JqTzdtbF9ncGpLamFUN0xmZFF0UQ.EPYB9Rdy
jCHFxrqpaEBWkPzhPmFrAPBKlkt8SQpcI0k71mH_vC6txh6Uv1NVQC4xYyWG7ueq5mb4mcQh1sCorcv15GwIH1R0v0NR_CRPh-M
DNSFtg8HNnWyC1ePsfUGpSqjucQW8RMdbsU03wDO50Pr3ctQI4BZrxiU4HW6tdQq9_TinizujACzE-LMZ6FlFAb6pPB8TDsFlY3
9OmBFXEanaPvZwE01dKjE1K_A_G1_TiJzWo4vwuNeD54HfmOf6hN1IE8-CCSKRoIFoIBiVNqqzyCybyovRlSCWzSaTNz4v9BD7N
2lDgEuBlpn3q0qTFppZzjEvzv3RicGrCC_tmB
Token Expires at: 2018-03-24T14:03:48.100Z
Download all catalog partitions
-
Open the Projects Manager, find your project and copy its HRN.

Figure 1. Project details -
Click the catalog you linked to the project and then click View to view the catalog.
-
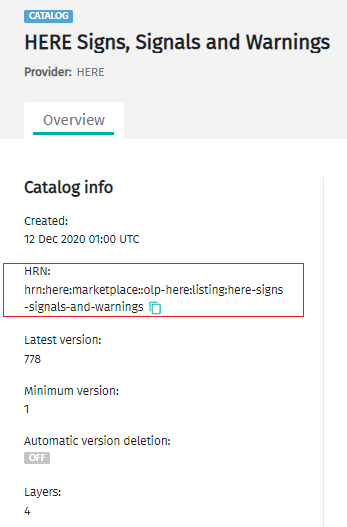
Locate and note the catalog HRN.

Figure 2. Example catalog HRN -
Select a layer from the Layers section and locate and note the Layer ID.

Figure 3. Example layer ID -
Run the following command in the OLP CLI to download the partitions within the scope of the purchased catalog:
olp catalog layer partition get <catalog HRN> <layer ID> [command options]
Specify the HRN of your project that you obtained aas described above in the --scope parameter and use the --all parameter to download all partitions of the selected catalog layer. For example, the following command downloads all partitions of the rules-and-regulations layer of the hrn:here:marketplace::olp-here:listing:here-signs-signals-and-warnings catalog:
olp catalog layer partition get hrn:here:marketplace::olp-here:listing:here-signs-signals-and-warnings rules-and-regulations --all --scope hrn:here-dev:authorization::orgXXX:project/my-project
For more information on downloading partitions using the OLP CLI, see the Command Line Interface User Guide.