- Products ProductsLocation Services
Solve complex location problems from geofencing to custom routing
PlatformCloud environments for location-centric solution development, data exchange and visualization
Tracking & PositioningFast and accurate tracking and positioning of people and devices, indoors or outdoors
APIs & SDKsEasy to use, scaleable and flexible tools to get going quickly
Developer EcosystemsAccess Location Services on your favorite developer platform ecosystem
- Documentation DocumentationOverview OverviewServices ServicesApplications ApplicationsDevelopment Enablers Development EnablersContent ContentHERE Studio HERE StudioHERE Workspace HERE WorkspaceHERE Marketplace HERE MarketplacePlatform Foundation and Policy Documents Platform Foundation and Policy Documents
- Pricing
- Resources ResourcesTutorials TutorialsExamples ExamplesBlog & Release Announcements Blog & Release AnnouncementsChangelog ChangelogDeveloper Newsletter Developer NewsletterKnowledge Base Knowledge BaseFeature List Feature ListSupport Plans Support PlansSystem Status System StatusLocation Services Coverage Information Location Services Coverage InformationSample Map Data for Students Sample Map Data for Students
- Help
Get started
This guide walks you through the first steps to build apps with the HERE SDK for Flutter. The HERE SDK for Flutter is tailored to bring the best and freshest assets from the HERE platform to your mobile applications.
Before you begin, make sure you have read the following:
Info
In order to start development, you need to get the HERE SDK package. It contains:
- The HERE SDK plugin folder. This includes the HERE SDK binaries.
- Several documentation assets and example apps.
- The HERE_NOTICE files that needs to be included in your app. See our open source notices.
You have two choices to get the HERE SDK package:
- Register or sign in on here-tech.skawa.fun and download the HERE SDK package from your projects and account page.
- Register or sign in on the HERE platform portal and download the HERE SDK package: Browse to the edition of your choice and click the Get Now button. Note that the package will download in the background. Be patient, it may take a while.
As a next step, choose a plan:
You can freely start using the HERE SDK. An overview of the available base plans can be found on the HERE Base Plan Pricing page. More details on the plans can be found in our pricing FAQs.
Depending on your plan the HERE SDK charges based on the number of transactions per month and other parameters such as monthly active users (MAU).
More information can be found in the Commercial Terms & Conditions.
Get your credentials
The HERE SDK requires two strings to authenticate your app:
- ACCESS KEY ID (
access_key_id): A unique ID for your account. - ACCESS KEY SECRET (
access_key_secret): A secret key, which is shown only once after creation time. Please make sure to note it down before leaving the page.
No other credentials or tokens are needed to use the HERE SDK.
You can register and manage your app as described in the Identity & Access Management guide. You can acquire credentials for you plan either from here-tech.skawa.fun or on the HERE platform portal:
- On here-tech.skawa.fun, after creating your project, generate an app to obtain an access key ID and access key secret. You can either choose an existing project or Select a plan for a new project. Then scroll down to the HERE SDK product family and click Create a Key.
- Alternatively, on the HERE platform portal go to your apps page and register a new app. Once registered, you can create credentials.
Your credentials will work with all example apps you can find on GitHub. For the Navigate Edition you need to contact your HERE representative to generate a set of evaluation credentials.
When you obtain your credentials, also a here.client.id or an APP ID is shown. These IDs are not needed by the public APIs of the HERE SDK, but they can be useful when contacting the HERE support team.
App credentials and project scope
When you plan to use the same credentials for multiple apps, then you also need to set a scope to differentiate your apps in our system. If you use your credentials only for a single app, then this is not needed.
Try the example apps
The easiest way to get started, is to try one of the example projects that are available for the HERE SDK on on GitHub.
Choose an example of your choice, then inside the example app's folder, open main.dart and set your credentials (key / secret).
Now add the HERE SDK plugin folder:
- Unzip the downloaded HERE SDK for Flutter package. This folder contains various files including this documentation.
- Inside you will find a TAR file that contains the HERE SDK for Flutter plugin.
- Now unzip the TAR file and rename the folder to 'here_sdk' and place it to the
pluginsfolder inside the example app's directory.
Finally, make sure that a device is attached or that an emulator (Android) or simulator (iOS) is running. Execute flutter run from the directory of the example on your terminal - or run the app from within your IDE.
Feel free to experiment with the code of the examples. You can also follow the guide below to get a more detailed introduction on how to use the HERE SDK to build apps.
Try the reference application
A reference application for the HERE SDK for Flutter (Navigate Edition) is available on GitHub: It shows how a complex and release-ready project targeting iOS and Android devices may look like. You can use it as a source of inspiration for your own HERE SDK based projects - in parts or as a whole. Many parts of the app overlap with the Explore Edition - however, guidance requires the Navigate Edition. At the moment, only HERE SDK 4.14.0.0 is supported.
You can see an overview of the available assets and code snippets in this ref app guide.
Create a new Flutter project and show a HERE map
As a very first step-by-step example, we will develop below a "Hello Map" Flutter application that shows - yes! - a map. If you want to integrate the HERE SDK into an existing application, you can skip this step. No specific SDK code is involved here.
If you are new to Flutter, please follow the guides on flutter.dev to help you get started with the first steps.
Note
The example code for "hello_map" is available from here.
You don't need any advanced Flutter or Android or iOS experience to follow this step-by-step instruction.
For this guide, we have used Android Studio version Dolphin | 2021.3.1 Patch 1 and Xcode version 14.2. In addition, we have used:
- Flutter 3.7.12
- Dart 2.19.6
Note that all example apps have been also tested with Flutter 3.10.5 and Dart 3.0.5.
Newer versions may also work, but are not guaranteed to work. It is recommended to use the Dart version that is bundled with Flutter.
Note
This guide does not cover changes that might be needed when you are migrating your app from a Flutter version that is older than the minium supported Flutter version 3.7.12. All example apps in this guide are compliant with the Flutter V2 plugin architecture. By default, new app projects created with Android Studio are already ready for V2 plugins when Flutter version 1.12 or higher is used.
Step 1: Create a Flutter project
To create a new HERE SDK for Flutter project:
First, create a new Flutter project, we have called it "hello_map". Make sure you can run your new Flutter project on an Android and iOS device of your choice to make sure that your Flutter SDK is configured correctly. If it does not work, please refer to the Flutter documentation.
Note
If you don't want to support both platforms, you can skip the steps for either iOS or Android. Note that the HERE SDK for Flutter does not support web and desktop apps.
Step 2: Integrate the HERE SDK into your app
As soon as you have verified that everything is set up correctly, it's time to integrate the HERE SDK for Flutter.
Note
Note that the HERE SDK is only available as a separate download. Artifactory support via Maven / Gradle, CocoaPods or pub.dev is not yet available. We plan to add SDK Dependency Management for a future release.
Unzip the downloaded HERE SDK for Flutter package. This package contains various files including this documentation:
- A license file.
- The Developer Guide.
- The API Reference.
- The Release Notes.
- A TAR file containing the HERE SDK for Flutter plugin. The file is named like this:
here_sdk-<edition>-<version>.release.tar.gz.
Unzip the TAR file, then rename the folder to here_sdk. The content of the plugin folder looks similar like below:
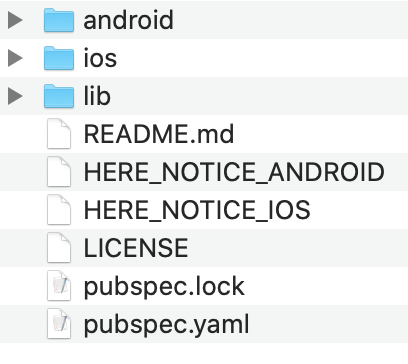
Now create a plugins folder inside your project and copy the renamed plugin folder to this new folder. With this, the content of the plugin folder is contained in hello_map/plugins/here_sdk.
Open the pubspec.yaml file of your Flutter project and add the path from above to the dependencies section. If you are not sure where to add this, it should look as follows:
dependencies:
  flutter:
    sdk: flutter

  cupertino_icons: ^0.1.3

  # The following adds the HERE SDK for Flutter plugin folder to your application.
  here_sdk:
    path: plugins/here_sdk
Of course, if you want, you can rename the plugin folder and adjust the path.
If the path is specified correctly, you can execute flutter pub get from your terminal and the HERE SDK should appear in your project tree. For example, if you are using Android Studio, it will appear under External Libraries -> Flutter Plugins.
After you have executed flutter pub get (or clicked the respective Pub get button in Android Studio or any other IDE), a new Podfile is created for iOS. Open hello_map/ios/Podfile and set the platform to the minimum supported iOS version.
Uncomment this line to define a global platform for your project:
platform :ios, '12.4'
Then open hello_map/ios/Runner.xcodeproj with Xcode and set the deployment target to the same iOS version (via Xcode: General -> Deployment Info -> Target). This step is needed if you want to build your app later on with flutter build ios from the terminal for release.
Now, adjust the minimum supported Android SDK version. Open /hello_map/android/app/build.gradle to change the minSdkVersion to:
minSdkVersion 21
Step 3: Initialize the HERE SDK
The HERE SDK is not initialized automatically. Instead, you can freely decide at which point in time the HERE SDK should be initialized. Initialization happens synchronously on the main thread and takes around 100 ms.
Note
Initialization of the HERE SDK will be successful even if your credentials are invalid. The best way to check if your credentials are valid is to try a feature engine. Invalid credentials will result in a dedicated error enum value. Note that certain features may require more rights than others. For example, the credentials obtained for the Explore Edition will result in an error when being used with the OfflineSearchEngine - which is not part of the subset of the Explore Edition.
Initialize the HERE SDK by executing the following method before you want to use any feature of the HERE SDK:
void _initializeHERESDK() async {
  // Needs to be called before accessing SDKOptions to load necessary libraries.
  SdkContext.init(IsolateOrigin.main);

  // Set your credentials for the HERE SDK.
  String accessKeyId = "YOUR_ACCESS_KEY_ID";
  String accessKeySecret = "YOUR_ACCESS_KEY_SECRET";
  SDKOptions sdkOptions = SDKOptions.withAccessKeySecret(accessKeyId, accessKeySecret);

  try {
    await SDKNativeEngine.makeSharedInstance(sdkOptions);
  } on InstantiationException {
    throw Exception("Failed to initialize the HERE SDK.");
  }
}
Make sure to insert correct credentials for key and secret. By calling makeSharedInstance() you initialize all what is needed to use the HERE SDK. The core class of the HERE SDK is called SDKNativeEngine. Under the hood, this instance is used by any other engine that is offered by the HERE SDK.
Make sure to call this code on the main thread.
Note
If you migrate from an older HERE SDK version, prior to 4.12.1.0, please also remove the credential tags (if any) from the AndroidManifest file and plist file.
The HERE SDK requires initialization of its native libraries via SdkContext, which should happen before your app widget is started. Below we show an example how to call initializeHERESDK() in the main() method of a widget - before accessing the MapView from your layout.
Similarly to initializeHERESDK(), you can also free resources by disposing the HERE SDK:
void _disposeHERESDK() async {
  // Free HERE SDK resources before the application shuts down.
  await SDKNativeEngine.sharedInstance?.dispose();
  SdkContext.release();
}
You can call disposeHERESDK() in the overriden dispose() method of a stateful widget.
Info
Tip: In the Key Concepts section you can find more ways to initialize the HERE SDK.
Step 4: Show a HERE map
Below you can see how to show a HERE map view. Remove all the code from your main.dart file and replace it with the following:
import 'package:flutter/material.dart';
import 'package:here_sdk/core.dart';
import 'package:here_sdk/core.engine.dart';
import 'package:here_sdk/core.errors.dart';
import 'package:here_sdk/mapview.dart';
void main() async {
// Usually, you need to initialize the HERE SDK only once during the lifetime of an application.
_initializeHERESDK();
runApp(MyApp());
}
void _initializeHERESDK() async {
// Needs to be called before accessing SDKOptions to load necessary libraries.
SdkContext.init(IsolateOrigin.main);
// Set your credentials for the HERE SDK.
String accessKeyId = "YOUR_ACCESS_KEY_ID";
String accessKeySecret = "YOUR_ACCESS_KEY_SECRET";
SDKOptions sdkOptions = SDKOptions.withAccessKeySecret(accessKeyId, accessKeySecret);
try {
await SDKNativeEngine.makeSharedInstance(sdkOptions);
} on InstantiationException {
throw Exception("Failed to initialize the HERE SDK.");
}
}
class MyApp extends StatelessWidget {
Widget build(BuildContext context) {
return MaterialApp(
title: 'HERE SDK for Flutter - Hello Map!',
home: HereMap(onMapCreated: _onMapCreated),
);
}
void _onMapCreated(HereMapController hereMapController) {
hereMapController.mapScene.loadSceneForMapScheme(MapScheme.normalDay, (MapError? error) {
if (error != null) {
print('Map scene not loaded. MapError: ${error.toString()}');
return;
}
const double distanceToEarthInMeters = 8000;
MapMeasure mapMeasureZoom = MapMeasure(MapMeasureKind.distance, distanceToEarthInMeters);
hereMapController.camera.lookAtPointWithMeasure(GeoCoordinates(52.530932, 13.384915), mapMeasureZoom);
});
}
}
Note
Null safety is supported by default. It can be optionally disabled, by adding the following comment on top of any Dart file: // @dart=2.9.
Since the HereMap is already implemented as a stateful widget, you can set it directly as the home for your app. The private _onMapCreated callback notifies us when the HereMapController instance is created. The HereMapController allows you to interact with the map.
Before you can see any vector tiles on the map, we must load a map scheme. Here we load MapScheme.normalDay. As an exercise, you can try to replace the above map scheme with the following: MapScheme.satellite. What do you get? Try out also other map schemes, like the normal night scheme.
The view onto the map can be defined via the camera object. In the example above we show a location in Berlin, Germany.
In general, it is recommended to wait with map manipulations until the scene has loaded. For example, camera operations may be enqueued until the scene is loaded, while other operations simply may have no effect without a map scene.
In addition, it is recommended to free resources when leaving the app by calling SDKNativeEngine.sharedInstance?.dispose() and SdkContext.release(). The SDKNativeEngine is implicitly created and set when the HERE SDK is automatically initialized. This can be done in the overridden dispose() method of a stateful widget. For simplicity, this has been left-out in the example above, but you can see this in the other available example apps on GitHub. More information on initialization can be found here.
Note that when an app is shutting down anyways, then it is not mandatory to dipose the SDKNativeEngine, but it doesn't do harm to do it and it is considered good practice to cancel ongoing requests and shut down the HERE SDK services. On the other hand, be careful to not dispose the HERE SDK too early when only one of your widgets is destroyed and other parts of your app still need the HERE SDK. In general, it is also possible to init / dispose the HERE SDK for each widget individually.
Step 5: Run your app
Now, it's time to build and run the app. Attach a device or start an emulator or simulator and execute flutter run from the app's directory - or run the app from within your IDE. If all goes well, you should see a HERE map covering the screen.

Additional information
You can find the most common usage principles to help you get the most out of the HERE SDK for Flutter in the Key Concepts section.
About the XCFW framework format for iOS
The included HERE SDK iOS framework (heresdk.xcframework) is not a fat binary, but it contains set of frameworks for several architectures - built for device (arm64) and simulator (x86_64). Therefore it contains multiple architectures. This allows easy deployment on a simulator and on a real device. It also contains debug symbols (dSYM) to symbolicate crashes in Xcode. Find more deatils on how to use the dSYM files to symbolicate crashes here.
Note
The file size is optimized by Xcode at deployment time and unnecessary frameworks are stripped out.
Since the HERE SDK framework conforms to Apple's XCFramework bundle type (XCFW), it is ready to be used for the distribution of your app on iOS devices via Apple's App Store.
What's next?
This is quick start guide is just a starting point. Take a look at our example apps and browse through the API Reference to discover a lot more exciting features. With the next releases we plan more tutorials and example apps. Stay tuned and thank you for using the HERE SDK for Flutter!
Troubleshooting
When you run into trouble, please make sure to first check the minimum requirements and the supported devices.
- Xcode does not compile my project for simulators. I am using a computer with a M1 chip. You are using a HERE SDK version below 4.9.2.0. Try to use a newer HERE SDK version or run in Rosetta mode by excluding the arm64 architecture for "Any iOS Simulator SDK" in the
Build Settings/Architectures/Excluded Architectures/Debugsetting within Xcode. Select this option in the "TARGETS" settings. Note that this may slightly slow down the performance when running the simulator. - I see only a blank white map: Make sure that your HERE credentials are valid and set as described in the Get Started section above. Also, make sure that your device is able to make an internet connection. With slower internet connections, it may take a while until you see the first map tiles loaded. Please also make sure that your device time is set correctly. In rare cases, a wrongly set device time can lead to authentication issues with some backend services.
- I see only a blank white map and logs show "Could not create root isolate.": This issue is unrelated to the HERE SDK and it may happen after you tried to downgrade to an older Flutter version. Try to clean your Flutter installation with:
$ rm -rf path/to/flutter/sdk/bin/cache/artifacts/engine/ios* $ flutter clean $ flutter run - In the logs I see "ios/Runner/GeneratedPluginRegistrant.m:12:9: Module 'here_sdk' not found": This may be related to this Flutter issue. Try to clean the project and podfile like so, then build again:
$ flutter clean $ rm ios/Podfile && flutter build ios - In the logs I see "No map content will be displayed until valid config is provided.": Make sure that your code is really calling
loadScene(). - The app crashes and in the logs I see "CL_magma - Couldn't load the default shader.": Your device must support OpenGL ES 3.0. If you are running a simulator, edit your emulator settings via Settings -> Advanced -> OpenGL ES API level. If it is set to "Autoselect", try to change it to "Renderer Maximum". This happens mostly on Windows machines.
- I am getting "No toolchains found in the NDK toolchains folder for ABI with prefix: arm-linux-androideabi": This happens when you have a NDK version installed that is incompatible with the Gradle version of your app. Either uninstall or downgrade your NDK version or change the Gradle classpath to a newer version. For example, change the classpath from:
classpath 'com.android.tools.build:gradle:3.5.4'toclasspath 'com.android.tools.build:gradle:4.1.3'. - I am seeing the following in a crash log: "Exception was thrown in Java and it was not handled.": The HERE SDK cannot handle runtime exceptions that are thrown on app side inside a callback. In such a case you will see this error log. It means that your code throws an exception in one of the HERE SDK callbacks that are handled by your application.
- I am getting a crash due to a cache lock: If an application crashes due to a
Storage.LevelDBerror or aFAILED_TO_LOCK_CACHE_FOLDERerror, follow this instruction to prevent such a crash from happening again. - I see a gray screen: If the logs repeatedly say "dequeueBuffer failed", then this is caused by a Flutter issue that might get fixed by a new Flutter version, eventually Flutter 1.20.3.
- I see no map and/or my HERE SDK calls do nothing: If you see the following log message "These credentials do not authorize access" then your credentials are not valid. Make sure you use a working set of credentials. Credentials from the 3.x editions are not compatible. Credentials from the Lite Edition or Explore Edition are not compatible with the Navigate Edition.
- I see graphical glitches on the map view: For some Android versions this may happen and it can be fixed by using the
MapRenderMode.texture. Find more details in the maps guide. - I see graphical glitches on the map view after screen orientation changes and the map tiles don't show up: For some Android versions this may happen and it can be fixed by using Flutter's Hybrid Composition render mode. Find more details in the maps guide.
- When I build for iOS release, the build fails: If you see in the logs that
-embed-bitcodeis executed, make sure to explicitely disable bitcode optimization. Apple deprecated bitcode and the HERE SDK no longer supports it. AddENABLE_BITCODE = NOto your config. For example, in yourios/Podfileadd the following:
post_install do |installer|
  installer.pods_project.targets.each do |target|
    flutter_additional_ios_build_settings(target)
    target.build_configurations.each do |config|
      config.build_settings['ENABLE_BITCODE'] = 'NO'
    end
  end
end
Need Help?
If you need help with this or any other HERE product, select one of the options below.
- If you have a HERE representative, contact them when you have questions/issues.
- If you manage your applications and accounts through here-tech.skawa.fun, log into your account and check the pages on the SLA report.
- Join our Slack Workspace.
- If you have more questions, you can also try to look for answers on stackoverflow.com/questions/tagged/here-api.
- If you have questions about billing, your account, or anything else Contact Us.
- If you have purchased your plan/product from a HERE reseller, contact your reseller.