- Products ProductsLocation Services
Solve complex location problems from geofencing to custom routing
PlatformCloud environments for location-centric solution development, data exchange and visualization
Tracking & PositioningFast and accurate tracking and positioning of people and devices, indoors or outdoors
APIs & SDKsEasy to use, scaleable and flexible tools to get going quickly
Developer EcosystemsAccess Location Services on your favorite developer platform ecosystem
- Documentation DocumentationOverview OverviewServices ServicesApplications ApplicationsDevelopment Enablers Development EnablersContent ContentHERE Studio HERE StudioHERE Workspace HERE WorkspaceHERE Marketplace HERE MarketplacePlatform Foundation and Policy Documents Platform Foundation and Policy Documents
- Pricing
- Resources ResourcesTutorials TutorialsExamples ExamplesBlog & Release Announcements Blog & Release AnnouncementsChangelog ChangelogDeveloper Newsletter Developer NewsletterKnowledge Base Knowledge BaseFeature List Feature ListSupport Plans Support PlansSystem Status System StatusLocation Services Coverage Information Location Services Coverage InformationSample Map Data for Students Sample Map Data for Students
- Help
Routing: Get directions
The HERE SDK provides a full-fledged RoutingEngine to calculate the best route directions from A to B, including multiple waypoints and localizable maneuver instructions for each turn.
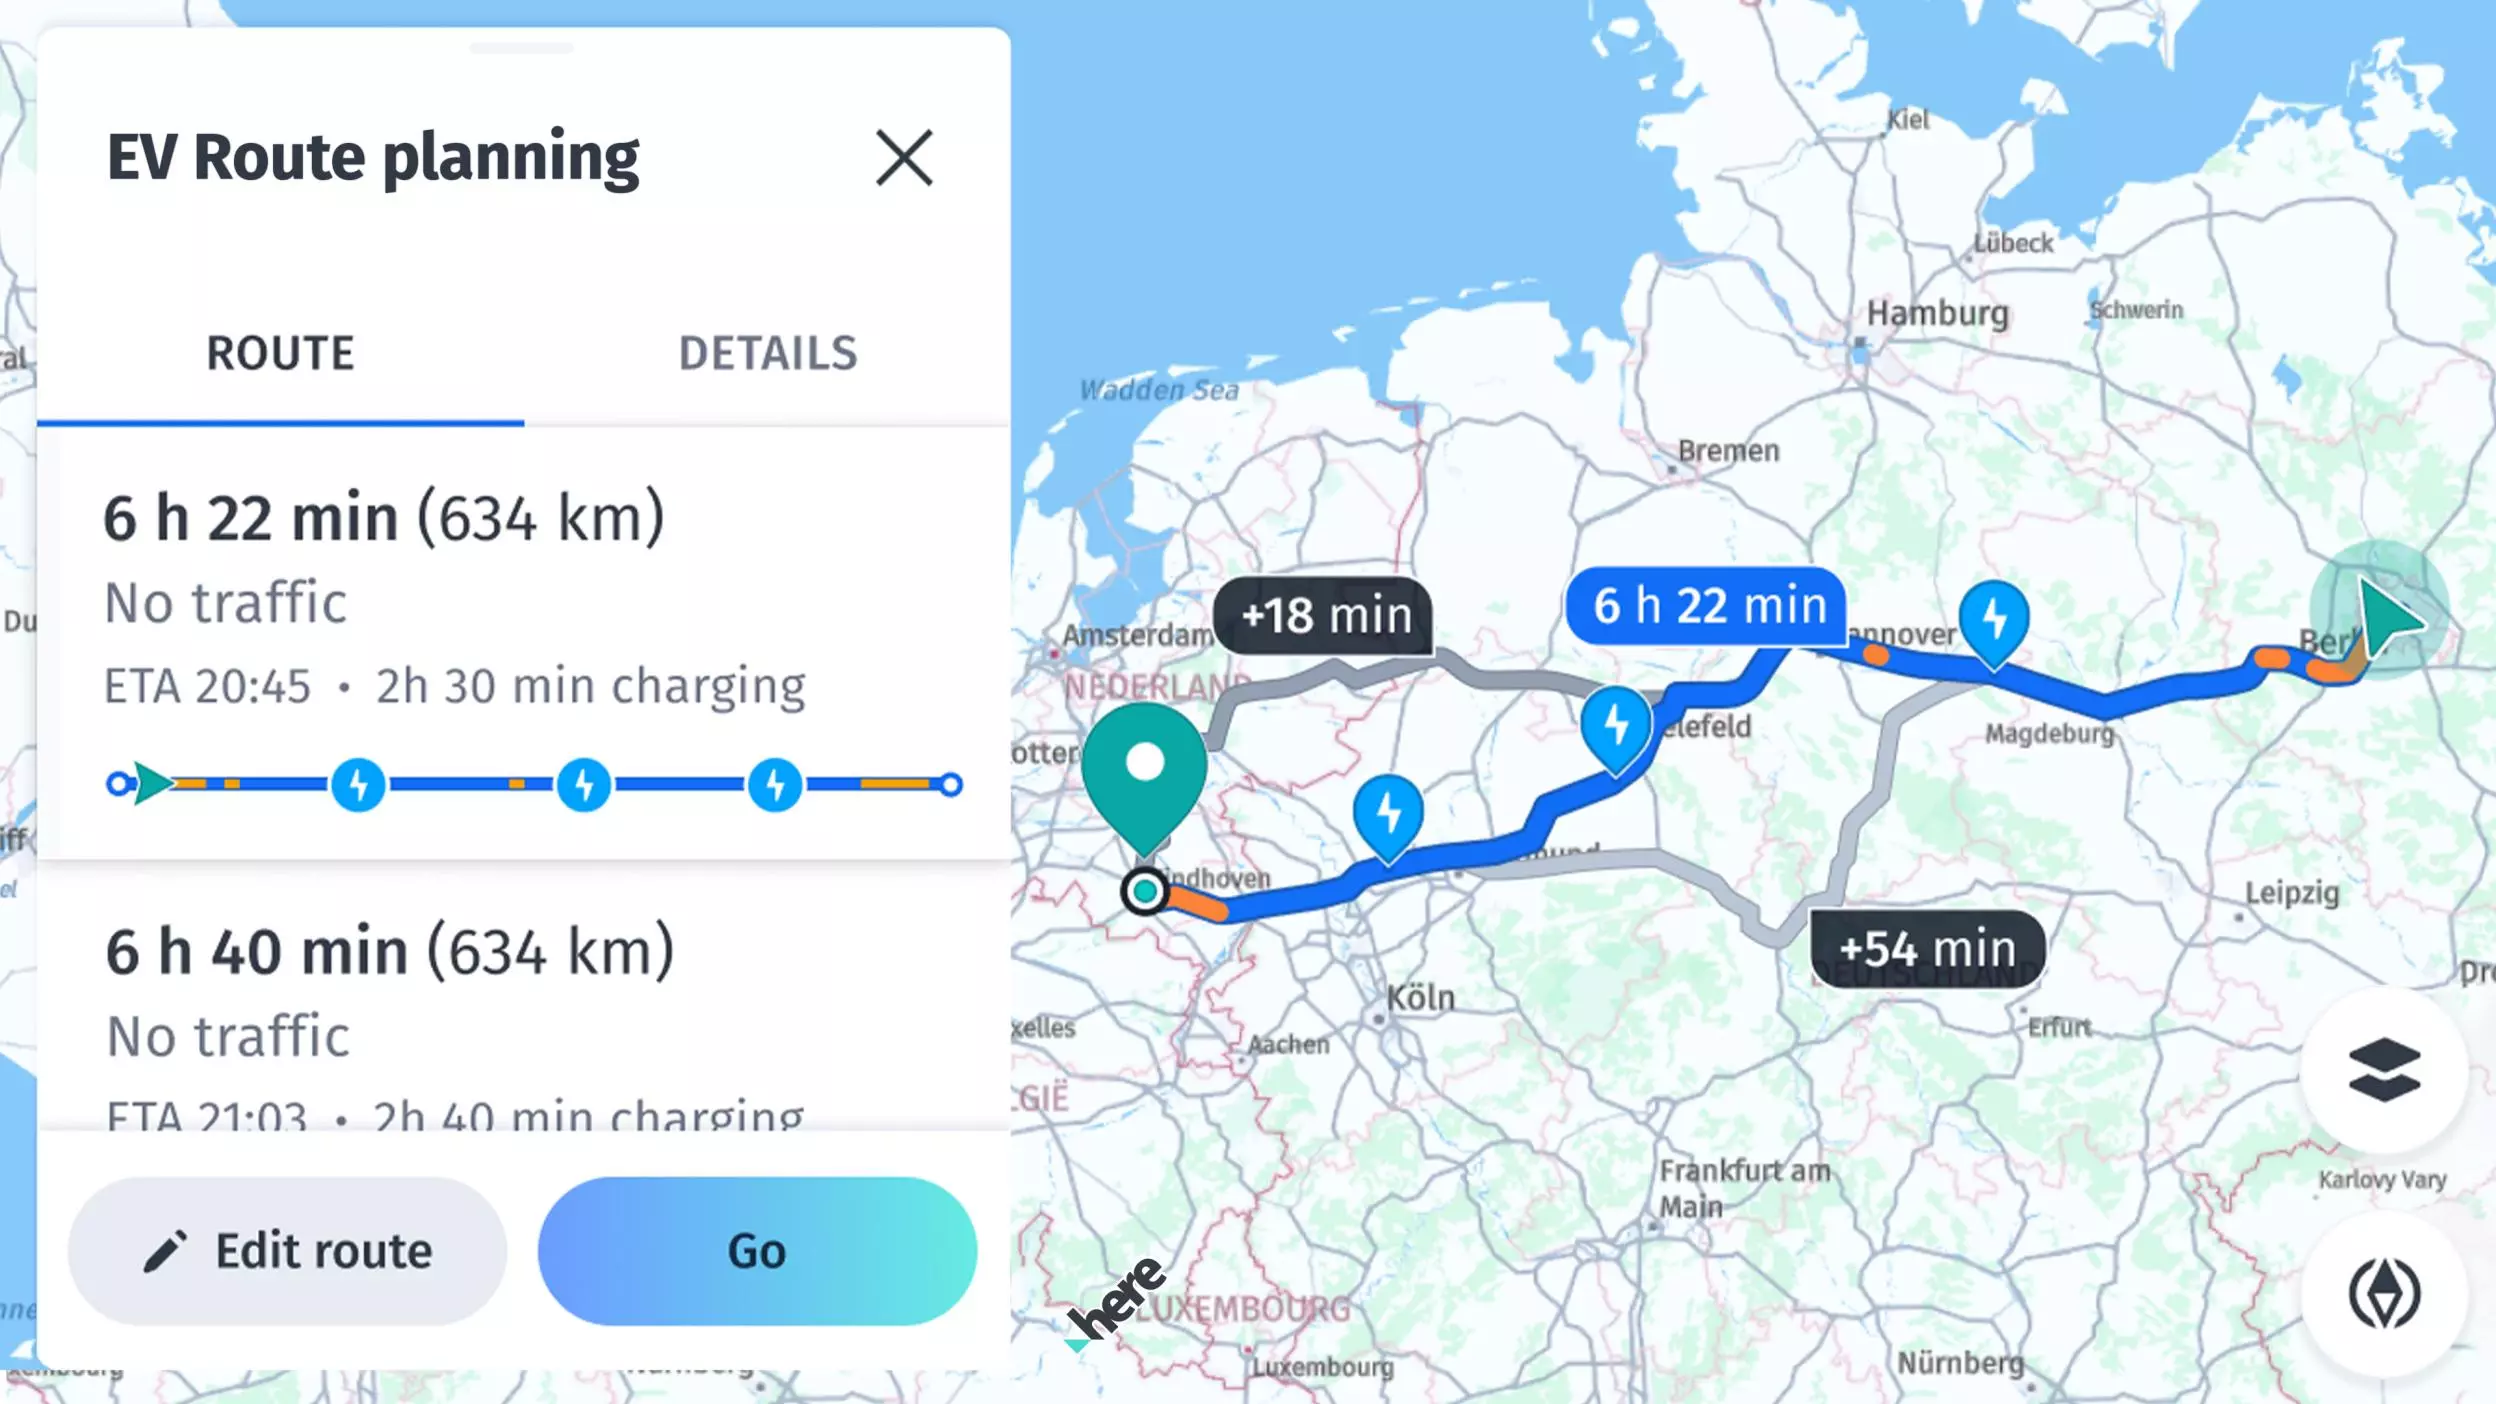
Specify your preferences by setting the desired route type (fastest or shortest) and various route options (such as speed profiles, route restrictions, vignette options, and more) to find the perfect route that saves the most energy: With our advanced routing technology and our dedicated EV route planning support HERE helps you to make the planet cleaner and safer .
Feature overview:
- Calculate routes: Calculate routes with multiple waypoints for various transport modes.
- Isoline routing: Calculate isoline polygons to represent the area of reach from a given point based on time, distance or fuel consumption.
- Search along a route: Search for places along an entire route (this feature is described in the Search section).
- Import routes / route matching: You can import routes from other APIs.
Get routes
The HERE SDK supports the following route types:
- Car route directions.
- Taxi route directions.
- Pedestrian route directions.
- Bicycle route directions.
- Truck route directions with highly customizable truck options.
- Scooter route directions.
- Bus route directions.
- Routes for electric vehicles to find the nearest charging stations (based on the calculated energy consumption and battery specifications).
- Public transit routes with highly customizable transit options (via
TransitRoutingEngine).
Each route type is determined by one of the available route options such as CarOptions or TruckOptions: Find here all available route options for each supported transport mode. These options can be set to the available overloads of the route engine's calculateRoute() method.
Start your trip by creating the route engine in this manner:
try {
  _routingEngine = RoutingEngine();
} on InstantiationException {
  throw ("Initialization of RoutingEngine failed.");
}
Creating a new RoutingEngine instance can throw an error that we have to handle as shown above. For example, such an error can happen when the HERE SDK initialization failed beforehand.
Note
It is not possible to initialize this engine during the Application's onCreate() method. Any other point in time is fine. For example, a good place to initialize this engine may be in an Activity's onCreate()-method.
As a next step, you can calculate the route based on two waypoints - a starting location and a destination (both of type Waypoint that holds a GeoCoordinates instance). Below we set default CarOptions to calculate a route that is optimized for cars:
Future<void> addRoute() async {
  var startGeoCoordinates = _createRandomGeoCoordinatesInViewport();
  var destinationGeoCoordinates = _createRandomGeoCoordinatesInViewport();
  var startWaypoint = Waypoint.withDefaults(startGeoCoordinates);
  var destinationWaypoint = Waypoint.withDefaults(destinationGeoCoordinates);

  List<Waypoint> waypoints = [startWaypoint, destinationWaypoint];

  _routingEngine.calculateCarRoute(waypoints, CarOptions(),
      (RoutingError? routingError, List<here.Route>? routeList) async {
    if (routingError == null) {
      // When error is null, it is guaranteed that the list is not empty.
      here.Route route = routeList!.first;
      _showRouteDetails(route);
      _showRouteOnMap(route);
      _logRouteViolations(route);
    } else {
      var error = routingError.toString();
      _showDialog('Error', 'Error while calculating a route: $error');
    }
  });
}
You can call calculateRoute() multiple times. For example, you can call it to calculate routes with different routing options in parallel.
Note
Tip: If a driver is moving, the bearing value can help to improve the route calculation: startWaypoint.headingInDegrees = currentLocation.bearingInDegrees;.
Each route calculation will be performed asynchronously. You will get a Route list or a RoutingError that holds a possible error when completed. If all goes well, RoutingError is null. In case of an error, the route list is null. For example, the engine cannot calculate routes if a route is not feasible for the specified mode of transportation.
Note
If there is no error, the route list will contain only one result. By specifying the number of route alternatives via the route options, you can request additional route variants. By default, a route will be calculated with no route alternatives.
The _showRouteDetails()-method from the code snippet above is used to show more route details including maneuver instructions. You can find the full source code in the accompanying example app. Maneuver instructions are also explained in greater detail below. The _showRouteOnMap()-method contains an example, how to render a route on the map. We will explain this shortly in the section below.
Note: Important
A route may contain a list of NoticeCode values that describe potential issues after a route was calculated. For example, when a route should avoid tunnels and the only possible route needs to pass a tunnel, the Route contains a notice that the requested avoidance of tunnels was violated.
- It is recommended to always check a calculated
Routefor possible violations. - The
NoticeCodeis part of aNoticeobject. A list of possibleNoticeobjects can be accessed perSectionof aRoute. - The list will be empty, when no violation occurred.
- If any possible violation is not desired, it is recommended to skip routes that contain at least one violation.
However, an implementation may judge case by case depending on the requested route options and the actual list of NoticeCode values. More about route options can be found in the next section. Important: For the sake of simplicity, the code snippets in this guide do not evaluate the possible enum values of a notice.
You can detect possible route notices with the following method:
// A route may contain several warnings, for example, when a certain route option could not be fulfilled.
// An implementation may decide to reject a route if one or more violations are detected.
void _logRouteViolations(here.Route route) {
  for (var section in route.sections) {
    for (var notice in section.sectionNotices) {
      print("This route contains the following warning: " + notice.code.toString());
    }
  }
}
Note
Tip: All routes contain altitude values along the route. For example, to create an elevation profile for a planned bicycle trip.
Use route options for each transport mode
For the example above, we have set a new CarOptions instance to calculate a car route. You can calculate routes for other transport modes by using dedicated route options for each transport mode. The following route options exist:
-
CarOptionsto calculate car routes:route.requestedTransportModeisTransportMode.car. -
TruckOptionsto calculate truck routes:route.requestedTransportModeisTransportMode.truck. -
PedestrianOptionsto calculate routes for pedestrians:route.requestedTransportModeisTransportMode.pedestrian. -
EVCarOptionsandEVTruckOptionsto calculate routes for electric vehicles:route.requestedTransportModeisTransportMode.carorTransportMode.truck. -
ScooterOptionsto calculate routes for scooters:route.requestedTransportModeisTransportMode.scooter. -
BicycleOptionsto calculate routes for bicycles:route.requestedTransportModeisTransportMode.bicycle. -
TaxiOptionsto calculate routes for taxis:route.requestedTransportModeisTransportMode.taxi. -
BusOptionsto calculate routes for buses:route.requestedTransportModeisTransportMode.bus. -
TransitRouteOptionsto calculate routes for public mass transit (only available viaTransitRoutingEngine):route.requestedTransportModeisTransportMode.publicTransit.
The TransportMode is set by the routing engine after route calculation has been completed - while getRequestedTransportMode() determines the transport mode from the route options, each Section of a Route can have a different transport mode: route.getSectionTransportMode() provides the actual SectionTransportMode that has to be used for a particular section - in addition to the transport modes from above, it lists also transport modes such as ferry and carShuttleTrain.
By default, when passing only start and destination waypoints, the resulting route will contain only one route Section. Each route object can contain more route sections depending on the number of set waypoints and transport modes. Sections act as a route leg that break a route into several logical parts. Find more about this here.
Although the main transport mode is specified by the user before calculating the route, the final transport modes are set by the routing engine per Section.
Note
A Route can contain more than one SectionTransportMode. In such a case, the route will split into another Section to indicate the change of the transport mode. Basically, changing the mode of transport requires a stop on a journey, for example, when leaving the car to take a ferry. However, multimodal routing (or intermodal routing) is not supported: If a car route includes as destination a sightseeing spot in a park then the last waypoint will be map-matched to the last location before the park that is reachable by car - and the route will not contain a pedestrian section.
Such gaps can be detected by comparing the mapMatchedCoordinates with the originalCoordinates of a RoutePlace object: An application can decide to fill the distance between these two coordinates with a new route calculation using a suitable transport mode as fallback - such modal routes can be composed with many different options as some users may prefer taking a taxi or public transit instead of taking a walk. Note that the HERE SDK supports such modal routes only as separate requests, so the application needs to implement the fallback logic. As an alternative, consider to use the Intermodal Routing API.
Note that all geographic coordinates along a route are map-matched (also known as snap-to-road). If additional Waypoints are added, they will be also map-matched and their original coordinates can be compared with the map-matched location inside a RoutePlace that is indicating the beginning and the end of a Section.
All of the available route options allow you to further specify several parameters to optimize the route calculation to your needs.
Each of the above options contains a field that holds a common RouteOptions object. This option allows you to specify common options such as the number of route alternatives or the OptimizationMode to find the optimal route based on travel time and route length.
Note
By default, a route will be calculated using the fastest route mode.
Alternatively, you can change the algorithm. For example, if you want to reach your destination quickly and the length of the route is less important to you, select the fastest route mode via RouteOptions. Select shortest if you prefer a shorter route, and time is not so important.
To find the best route for you, the routing algorithm takes into account many different parameters. This does not mean the algorithm will always provide the absolute shortest or fastest route. For example, consider the following road network:
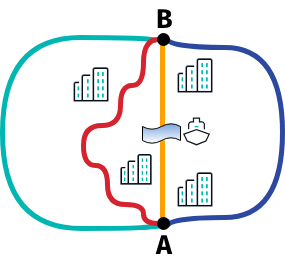
When you plan a trip from A to B, you may have the choice between four different roads. Let's assume that the green route represents a highway, then this road may be the fastest route, although it is longer than any of the other routes that would guide you through a city.
If you prefer to take the shortest route, the algorithm may favor the blue route, although the yellow and the red routes are shorter. Why is this so? The yellow road is the shortest route, of course, but it has to cross a river where a ferry has to be taken. This could be regarded by the algorithm as time-costly. As a result, it is possible to prefer the red or blue route instead of the yellow route, even though both are slightly longer.
Let's explore the other two options. When comparing the blue and the red route, the routing algorithm may recommend the blue route as the shortest although it is slightly longer than the red route: several turns are typically not beneficial to a driver. In this case, the red route contains more turns than the blue route, but the blue route may be the preferred route as it is only slightly longer. The routing algorithm penalizes turns and many other road properties, such as traffic lights or rail crossings that can slow a driver down.
Note
Along with the common routing options, the HERE SDK offers specialized options for the various supported transport modes, such as truck routing, where you can specify, for example, the dimensions of your truck to find only the suitable routes where your truck would fit - considering parameters such as road width or tunnel height.
While the resulting routes are optimized based on certain criteria, there may be situations where you don't want to rely on that. Imagine a city trip through Berlin - finding the fastest or shortest route may not be an option if you want to experience many sightseeing spots the city has to offer. In such cases, setting additional waypoints may be a good idea. Find an example below.
Get truck routes
The HERE SDK supports different transport modes (see above) for route calculation. Similar to the example above that shows how to calculate a route optimized for cars, you can also calculate routes for other transport types such as trucks.
While you can already get a route optimized for trucks by setting the default options, there are many more options available to find the best routes for a truck.
For example, TruckOptions contains additional fields such as TruckSpecifications to specify the dimensions of your truck, and more, that can be optionally applied to take the vehicle weight and other parameters into account.
Get public transit routes
Use the TransitRoutingEngine to calculate public transit routes from A to B with a number of waypoints in between. You can find a PublicTransit example app on GitHub that shows how to do this.
Shape the route with additional waypoints
By default, when setting only start and destination waypoints, the resulting route will contain only one route Section. Each route object can contain more route sections depending on the number of set waypoints. Sections act as a route leg that break a route into several logical parts.
Waypoints are coordinates that can be set by the user to determine more sections or the shape the route (which can be useful if you want to make sure you cross a river with a ferry, for example).
Note that the online RoutingEngine supports only a limited number of waypoints of around 200 waypoints at most.
There can be two types of waypoints:
-
stopover: The default waypoint type. It is guaranteed that this point will be passed, therefore it appears in the list of maneuver instructions, and splits the route into separate route sections. -
passThrough: May not appear in the maneuver instructions list and is rather treated as a hint to shape the route, for example, as a result of a touch input. This type will not split the route into separate sections.
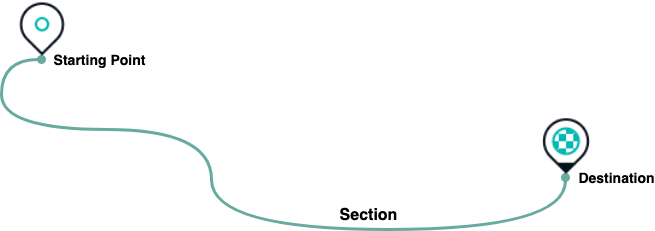
When creating a new Waypoint object, the stopover type is set by default - and this must be the type used for the first and the last waypoint. With just two waypoints acting as the start and destination, a route might look like below:
The RoutingEngine can handle multiple waypoints. The underlying algorithm will try to find the best path to connect all waypoints while respecting the order of the provided List - as well as the WaypointType. Each stopover-waypoint is passed between the starting location and the destination, which are the first and last item of the waypoint list respectively.
var startWaypoint = Waypoint.withDefaults(_startGeoCoordinates);
var destinationWaypoint = Waypoint.withDefaults(_destinationGeoCoordinates);

// Additional waypoints.
var waypoint1 = Waypoint.withDefaults(_createRandomGeoCoordinatesInViewport());
var waypoint2 = Waypoint.withDefaults(_createRandomGeoCoordinatesInViewport());

List<Waypoint> waypoints = [startWaypoint, waypoint1, waypoint2, destinationWaypoint];

_routingEngine.calculateCarRoute(waypoints, CarOptions(),
    (RoutingError? routingError, List<here.Route>? routeList) async {
  if (routingError == null) {
    // When error is null, it is guaranteed that the list is not empty.
    here.Route route = routeList!.first;
    _showRouteDetails(route);
    _showRouteOnMap(route);
    _logRouteViolations(route);
  } else {
    var error = routingError.toString();
    _showDialog('Error', 'Error while calculating a route: $error');
  }
});
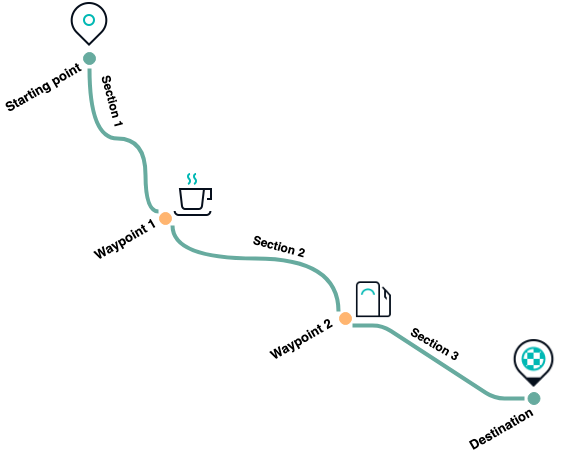
By adding two additional stopover-waypoints to the route using the code snippet above, we now have three route sections between the starting point and the destination as seen in the illustration below.
Note
The waypoints list order defines the order in which they are going to be passed along the route.
Additional information on the route - such as the estimated time it takes to travel to the destination and the total length of the route in meters - can be retrieved from the Route object as shown below:
// estimatedTravelTimeInSeconds includes traffic delay.
int estimatedTravelTimeInSeconds = route.duration.inSeconds;
int estimatedTrafficDelayInSeconds = route.trafficDelay.inSeconds;
int lengthInMeters = route.lengthInMeters;
Travel time and length are also available for each Section:
void _logRouteSectionDetails(here.Route route) {
  DateFormat dateFormat = DateFormat().add_Hm();

  for (int i = 0; i < route.sections.length; i++) {
    Section section = route.sections.elementAt(i);

    print("Route Section : " + (i + 1).toString());
    print("Route Section Departure Time : " + dateFormat.format(section.departureLocationTime!.localTime));
    print("Route Section Arrival Time : " + dateFormat.format(section.arrivalLocationTime!.localTime));
    print("Route Section length : " + section.lengthInMeters.toString() + " m");
    print("Route Section duration : " + section.duration.inSeconds.toString() + " s");
  }
}
Without additional stopover-waypoints, the route will contain only one Section. If additional stopover-waypoints are provided, the route is separated into several route sections between each waypoint, as well as from the starting point to the first waypoint and from the last waypoint to the destination.
Note
By default, an additional waypoint splits a route into separate sections and forces the route to pass this point and to generate a maneuver instruction for it.
Each Section contains the shape of the route in form of a GeoPolyline - represented as an array of coordinates where the first coordinate marks the starting point and the last one the destination.
This can be useful to visualize the route on the map by using, for example, map polylines in a different color for each Section. However, you can also get the polyline directly from the Route object.
Below is a code snippet that shows how this could be implemented by using a MapPolyline that is drawn between each coordinate of the route including the starting point and the destination:
_showRouteOnMap(here.Route route) {
  // Show route as polyline.
  GeoPolyline routeGeoPolyline = route.geometry;
  double widthInPixels = 20;
  MapPolyline routeMapPolyline = MapPolyline(routeGeoPolyline, widthInPixels, Color.fromARGB(160, 0, 144, 138));
  _hereMapController.mapScene.addMapPolyline(routeMapPolyline);
}
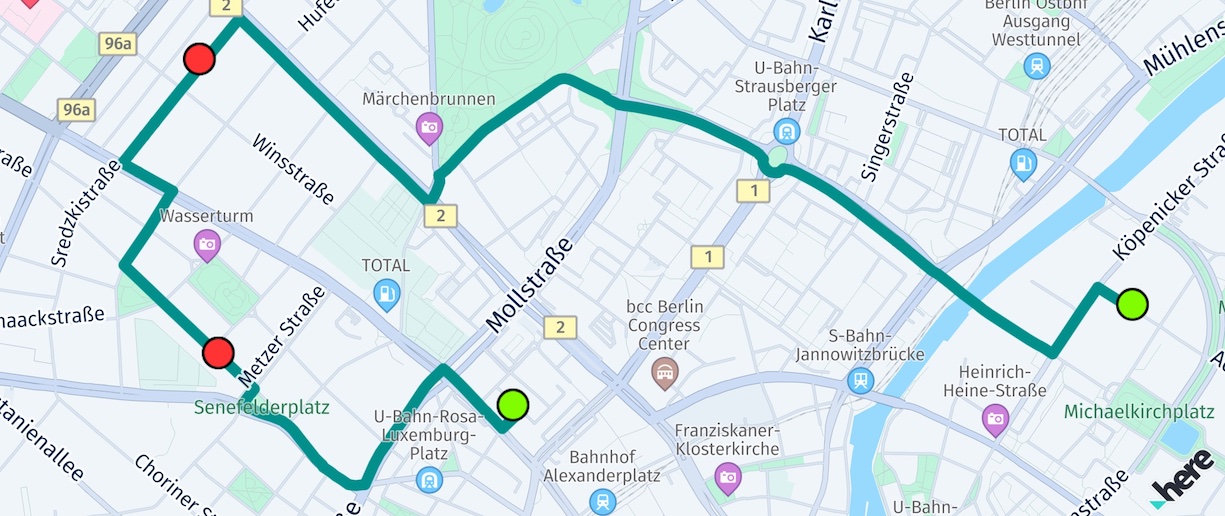
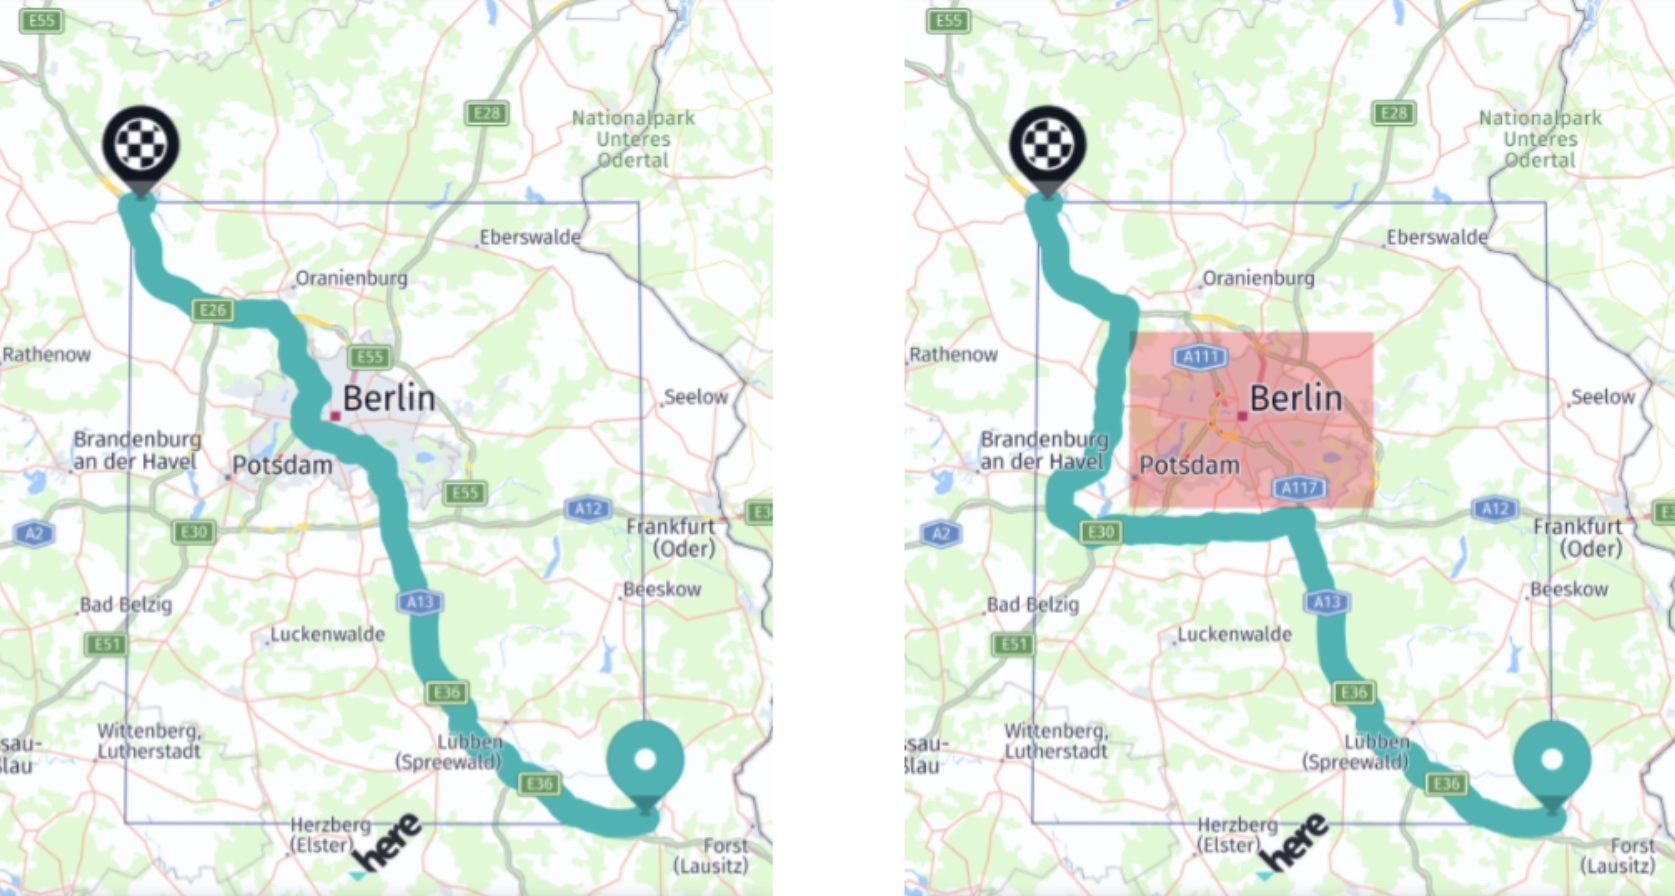
The first screenshot below shows a route without additional waypoints - and therefore only one route section. Starting point and destination are indicated by green-circled map marker objects. Note that the code for drawing the circled objects is not shown here, but can be seen from the example's source code, if you are interested.
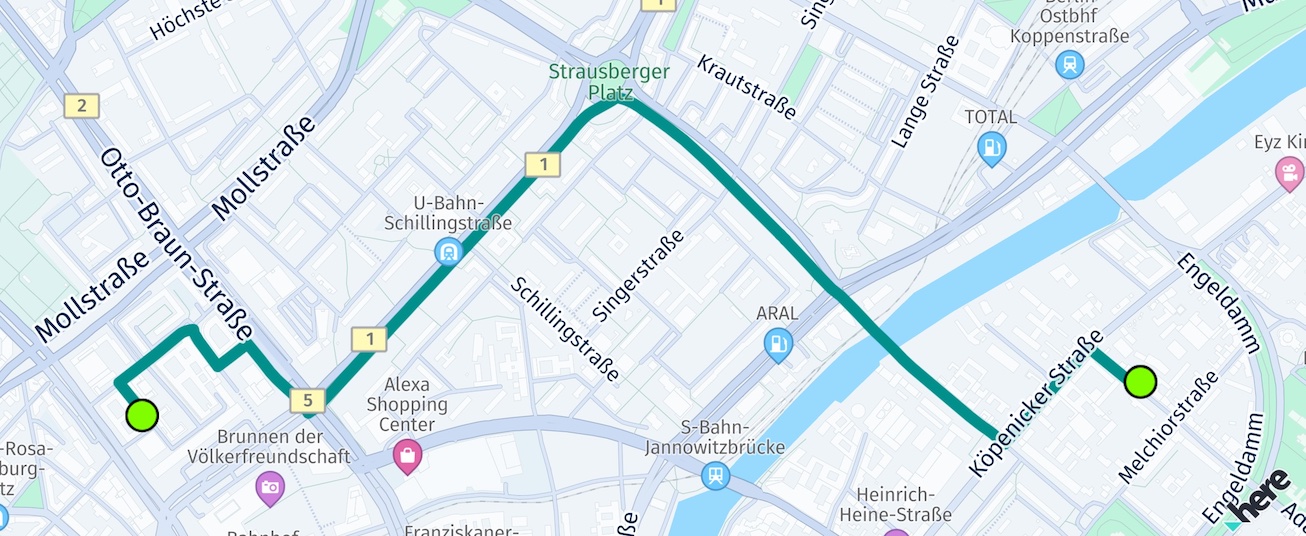
The second screenshot shows the same route as above, but with two additional stopover-waypoints, indicated by red-circled map marker objects. The route therefore, contains three route sections.
Note that internally, rendering of the MapPolyline is optimized for very long routes. For example, on a higher zoom level, not every coordinate needs to be rendered, while for lower zoom levels, the entire route is not visible. The algorithm for this is not exposed, but the basic principle can be seen in the flexible-polyline open-source project from HERE.
Get map-matched waypoints
For calculating a route, you can use any desired location as start, destination or as intermediate stopover or passThrough waypoint - even if it is off-road. The resulting route may, however, not exactly pass through the specified waypoint. The routing algorithm will attempt to come as close to the specified coordinates as possible. To achieve this, the HERE SDK incorporates an advanced technique to find the nearest route segment for each set of coordinates - taking various parameters such as the specified transportation mode into account. This process is called map matching.
The route shape, however, consists only of map-matched waypoints.
For each Section of a Route you can access a RoutePlace at the beginning (departure place) of a section and at the end (arrival place). A Routeplace contains mapMatchedCoordinates and originalCoordinates that were passed as parameters. Both can be equal or different. If they are different, it means that the originalCoordinates do not lie on a road.
A RoutePlace contains more information that might be useful to assist you on your trip. For example, you can access chargingStation information along with chargeInKilowattHours - useful for electric vehicles (see below) - and the sideOfDestination of the original waypoint.
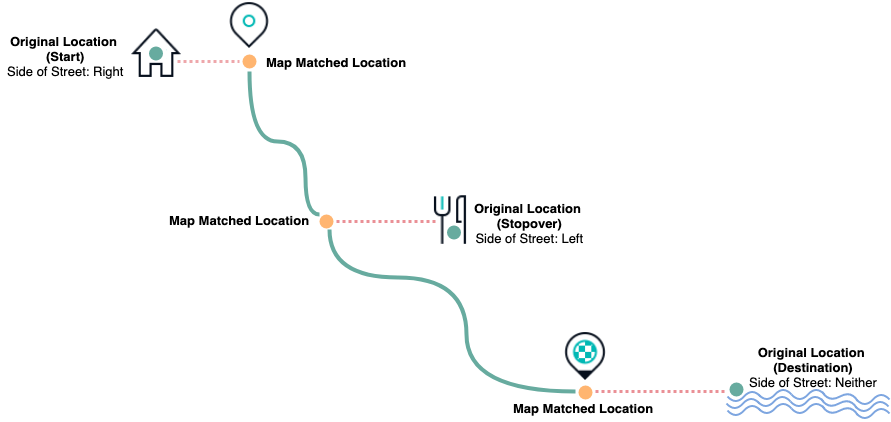
Imagine you are traveling along the route and as a stopover, you have specified a sightseeing spot which is off the road. When you reach the corresponding map matched waypoint - while staying on the road and heading towards your destination along the route, the sideOfDestination field will indicate whether your sightseeing spot (or restaurant as illustrated above) is on the left or on the right side of the street you are currently travelling on.
In some cases, a specified stopover may also be in front of you, above or even below your current location - in such a case, the sideOfDestination field will indicate the location as undefined - for example, if you are attempting to reach a lake and the road ends right in front of it.
Set a place as waypoint
A Place obtained from the SearchEngine may contain one or more access points. For example, a large warehouse can have multiple entrances, while the center of the warehouse may not be directly reachable. Note that access points are meant to be reachable by vehicles.
For routes it is recommended to navigate to one of the available access points (if any), whereas the sideOfStreetHint should be set to the geographic coordinates of the place. The list is empty when no access points are known or when the place is directly reachable.
List<GeoCoordinates> accessPoints = place.accessPoints;
// A Place always contains coordinates unless it is a suggestion.
Waypoint destinationWaypoint = Waypoint(place.geoCoordinates!);
if (!accessPoints.isEmpty) {
  // Set the first access point of a place as route destination.
  destinationWaypoint.coordinates = accessPoints.first;
  // When reaching destination provide a hint on the actual location of the place.
  destinationWaypoint.sideOfStreetHint = place.geoCoordinates;
  // Always prefer the given side of street hint, even if the street has no lane dividers.
  destinationWaypoint.matchSideOfStreet = MatchSideOfStreet.always;
}
A RoutePlace on the resulting Route object contains a RoutePlaceType which is set to accessPoint when a waypoint was set to an access point.
Take a look at the above illustration to see how the sideOfStreetHint will impact the SideOfDestination of a RoutePlace.
Note that if a place contains multiple access points, the user is responsible for selecting an appropriate one.
Set a waypoint as starting point
When starting a trip it may help to provide the RoutingEngine additional hints to choose the appropriate start direction - for example, to enforce necessary u-turns.
For example, you can specify the initial heading direction like this:
startWaypoint.headingInDegrees = location.bearingInDegrees;
If a user is moving, the bearing value can help to improve the route calculation. Note that the Location object contains a bearing value when it is taken from a positioning source and the user was already moving. Otherwise, it may not be set. Such a scenario may be more common during guidance, for example, when it is necessary to recalculate a route after a user has deviated from the proposed path.
Zoom to the route
For some use cases, it may be useful to zoom to the calculated route. The camera class provides a convenient method to adjust the viewport so that a route fits in:
GeoBox routeGeoBox = route!.boundingBox;
// Keep default orientation for bearing and tilt.
_hereMapController.camera.lookAtAreaWithGeoOrientation(routeGeoBox, GeoOrientationUpdate(null, null));
Here we use the enclosing bounding box of the route object. This can be used to instantly update the camera: Zoom level and target point of the camera will be changed, so that the given bounding rectangle fits exactly into the viewport. Additionally, we can specify an orientation to specify more camera parameters - here we keep the default values. Note that calling lookAtAreaWithOrientation() will instantly change the view.
For most use cases, a better user experience is to zoom to the route with an animation. Below you can see an example that zooms to a GeoBox plus an additional padding of 50 pixels:
void _animateToRoute(here.Route route) {
  // The animation results in an untilted and unrotated map.
  double bearing = 0;
  double tilt = 0;
  // We want to show the route fitting in the map view with an additional padding of 50 pixels.
  Point2D origin = Point2D(50, 50);
  Size2D sizeInPixels = Size2D(_hereMapController.viewportSize.width - 100, _hereMapController.viewportSize.height - 100);
  Rectangle2D mapViewport = Rectangle2D(origin, sizeInPixels);

  // Animate to the route within a duration of 3 seconds.
  MapCameraUpdate update = MapCameraUpdateFactory.lookAtAreaWithGeoOrientationAndViewRectangle(route!.boundingBox,
      GeoOrientationUpdate(bearing, tilt),
      mapViewport);
  MapCameraAnimation animation = MapCameraAnimationFactory.createAnimationFromUpdate(
      update, const Duration(milliseconds: 3000), EasingFunction.inCubic);
  _hereMapController.camera.startAnimation(animation);
}

The `CameraKeyframeTracks` example app shows how this can look like.
Get maneuver instructions
Each Section contains the maneuver instructions a user may need to follow to reach the destination. For each turn, a Maneuver object contains an action and the location where the maneuver must be taken. The action may indicate actions like "depart" or directions such as "turn left".
List<Section> sections = route.sections;
for (Section section in sections) {
  _logManeuverInstructions(section);
}
And here is the code to access the maneuver instructions per section:
void _logManeuverInstructions(Section section) {
  print("Log maneuver instructions per route section:");
  List<Maneuver> maneuverInstructions = section.maneuvers;
  for (Maneuver maneuverInstruction in maneuverInstructions) {
    ManeuverAction maneuverAction = maneuverInstruction.action;
    GeoCoordinates maneuverLocation = maneuverInstruction.coordinates;
    String maneuverInfo = maneuverInstruction.text +
        ", Action: " +
        maneuverAction.toString() +
        ", Location: " +
        maneuverLocation.toString();
    print(maneuverInfo);
  }
}
This may be useful to easily build maneuver instructions lists describing the whole route in written form. For example, the ManeuverAction enum can be used to build your own unique routing experience.

Note
The attributes maneuverInstruction.roadTexts, maneuverInstruction.nextRoadTexts and maneuverInstruction.exitSignTexts are only available for users of editions such as the Navigate Edition as they are meant to be shown as part of turn-by-turn maneuvers during navigation. If taken from a Route instance, these attributes are always empty.
In the API Reference you can find an overview of the available maneuver actions.
The below table shows all ManeuverAction items with a preview description and an asset example. Note that the HERE SDK itself does not ship with maneuver icons. The assets are available as SVGs or solid PNGs in different densities as part of the open-source HERE Icon Library.
The available maneuver actions are sorted in the order as they appear in the API Reference:
| Maneuver Action | Description Example | Icon Example |
|---|---|---|
| depart | Departure maneuver, such as "Start at <road name>". | |
| arrive | Arrival maneuver, such as "Arrive at". Example description for in-between waypoint(s): "Arrive at <road name | waypoint>". For the destination of a route: "Arrive at <road name | destination name | destination>". | |
| leftUTurn | Left-hand U-turn maneuver, such as "Make a U-turn at <next road name>". | |
| sharpLeftTurn | Sharp left turn maneuver, such as "Make a hard left turn onto <next road name>". | |
| leftTurn | Left turn maneuver, such as "Turn left on <next road name>". | |
| slightLeftTurn | Slight left turn maneuver, such as "Bear left onto <next road name>". | |
| continueOn | Continue maneuver, such as "Continue on <road name>". | |
| slightRightTurn | Slight right turn maneuver, such as "Bear right onto <next road name>". | |
| rightTurn | Right turn maneuver, such as "Turn right on <next road name>". | |
| sharpRightTurn | Sharp right turn maneuver, such as "Make a hard right turn onto <next road name>". | |
| rightUTurn | Right u-turn maneuver, such as "Make a right U-turn at <next road name>". | |
| leftExit | Left exit maneuver, such as "Take the left exit to <next road name>". | |
| rightExit | Right exit maneuver, such as "Take the right exit to <next road name>". | |
| leftRamp | Left ramp maneuver, such as "Take the left ramp onto". | |
| rightRamp | Right ramp maneuver, such as "Take the right ramp onto". | |
| leftFork | Left fork maneuver, such as "Take the left fork onto <next road name>". | |
| middleFork | Middle fork maneuver, such as "Take the middle fork onto <next road name>". | |
| rightFork | Right fork maneuver, such as "Take the right fork onto <next road name>". | |
| enterHighwayFromLeft | Enter highway from left maneuver, such as "Join the highway from the left side". | |
| enterHighwayFromRight | Enter highway from right maneuver, such as "Join the highway from the right side". | |
| leftRoundaboutEnter | Roundabout maneuver (left-hand traffic), such as "Enter the roundabout". | |
| rightRoundaboutEnter | Roundabout maneuver (right-hand traffic), such as "Enter the roundabout". | |
| leftRoundaboutPass | Roundabout maneuver (left-hand traffic), such as "Pass the roundabout". | |
| rightRoundaboutPass | Roundabout maneuver (right-hand traffic), such as "Pass the roundabout". | |
| leftRoundaboutExit1 | Roundabout maneuver (left-hand traffic), such as "Take the first exit of the roundabout". | |
| leftRoundaboutExit2 | Roundabout maneuver (left-hand traffic), such as "Take the second exit of the roundabout". | |
| leftRoundaboutExit3 | Roundabout maneuver (left-hand traffic), such as "Take the third exit of the roundabout". | |
| leftRoundaboutExit4 | Roundabout maneuver (left-hand traffic), such as "Take the fourth exit of the roundabout". | |
| leftRoundaboutExit5 | Roundabout maneuver (left-hand traffic), such as "Take the fifth exit of the roundabout". | |
| leftRoundaboutExit6 | Roundabout maneuver (left-hand traffic), such as "Take the sixth exit of the roundabout". | |
| leftRoundaboutExit7 | Roundabout maneuver (left-hand traffic), such as "Take the 7th exit of the roundabout". | |
| leftRoundaboutExit8 | Roundabout maneuver (left-hand traffic), such as "Take the 8th exit of the roundabout". | |
| leftRoundaboutExit9 | Roundabout maneuver (left-hand traffic), such as "Take the 9th exit of the roundabout". | |
| leftRoundaboutExit10 | Roundabout maneuver (left-hand traffic), such as "Take the 10th exit of the roundabout". | |
| leftRoundaboutExit11 | Roundabout maneuver (left-hand traffic), such as "Take the 11th exit of the roundabout". | |
| leftRoundaboutExit12 | Roundabout maneuver (left-hand traffic), such as "Take the 12th exit of the roundabout". | |
| rightRoundaboutExit1 | Roundabout maneuver (right-hand traffic), such as "Take the first exit of the roundabout". | |
| rightRoundaboutExit2 | Roundabout maneuver (right-hand traffic), such as "Take the second exit of the roundabout". | |
| rightRoundaboutExit3 | Roundabout maneuver (right-hand traffic), such as "Take the third exit of the roundabout". | |
| rightRoundaboutExit4 | Roundabout maneuver (right-hand traffic), such as "Take the fourth exit of the roundabout". | |
| rightRoundaboutExit5 | Roundabout maneuver (right-hand traffic), such as "Take the fifth exit of the roundabout". | |
| rightRoundaboutExit6 | Roundabout maneuver (right-hand traffic), such as "Take the sixth exit of the roundabout". | |
| rightRoundaboutExit7 | Roundabout maneuver (right-hand traffic), such as "Take the 7th exit of the roundabout". | |
| rightRoundaboutExit8 | Roundabout maneuver (right-hand traffic), such as "Take the 8th exit of the roundabout". | |
| rightRoundaboutExit9 | Roundabout maneuver (right-hand traffic), such as "Take the 9th exit of the roundabout". | |
| rightRoundaboutExit10 | Roundabout maneuver (right-hand traffic), such as "Take the 10th exit of the roundabout". | |
| rightRoundaboutExit11 | Roundabout maneuver (right-hand traffic), such as "Take the 11th exit of the roundabout". | |
| rightRoundaboutExit12 | Roundabout maneuver (right-hand traffic), such as "Take the 12th exit of the roundabout". | |
Note that for now, the HERE assets for leftRoundaboutPass and rightRoundaboutPass are only available as SVGs - and some maneuver assets are only available in the sub-folder "wego-fallback-roundabout". For the PNG representation, also the MSDKUI open-source project can be used as a fallback.
Find traffic along a route
You can get the overall time you are stuck in a traffic jam with:
int estimatedTrafficDelayInSeconds = route.trafficDelay.inSeconds;
More granular information about the traffic situation is available for the individual sections of a route: In addition to maneuvers (see above), each Section of a Route contains information of the traffic flow situation at the time when the route was calculated.
Each Section can contain a various amount of TrafficSpeed instances. These are valid along the Span until the next Span. Each Span geometry is represented by a polyline that is part of the full route's polyline shape.
The following code snippet shows how to get a TrafficSpeed element of the first Span of a Section:
Section firstSection = route.sections.first;
TrafficSpeed firstTrafficSpeed = firstSection.spans.first.trafficSpeed;
TrafficSpeed contains the baseSpeedInMetersPerSecond, which is the expected default travel speed. Note that this may not be the same as the current speed limit on a road - as a bad road condition may justify a slower travel speed. In addition, you can get the estimated actual travel speed based on the current traffic conditions with trafficSpeedInMetersPerSecond.
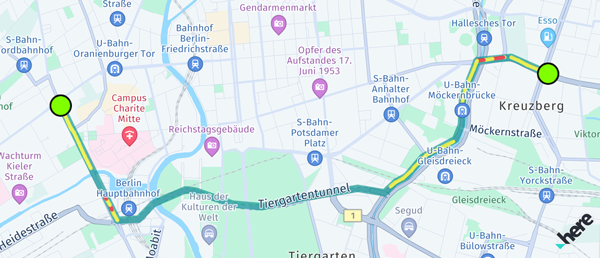
Similar to the color encoding used for the traffic flow layer, you can indicate the traffic along a route using a jamFactor that has a range from 0 (no traffic) to 10 (road is blocked). See the Traffic section for more details on the traffic features of the HERE SDK.
An example how this value can be mapped to a suitable color is shown below:
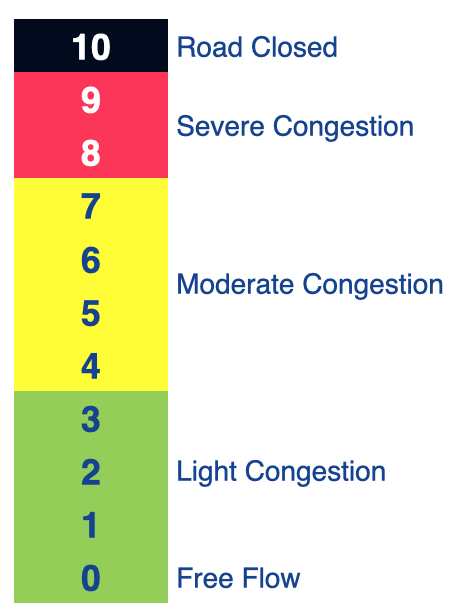
Usually, the jamFactor can be interpreted like this:
- 0 <=
jamFactor< 4: No or light traffic. - 4 <=
jamFactor< 8: Moderate or slow traffic. - 8 <=
jamFactor< 10: Severe traffic. -
jamFactor= 10: No traffic, ie. the road is blocked.
Note
Note that the jamFactor indicating TrafficSpeed is calculated linear from the ratio of trafficSpeedInMetersPerSecond / baseSpeedInMetersPerSecond - without taking road types and other parameters into account. Therefore, the provided jamFactor does not necessarily match exactly the traffic flow visualization on the map view (if enabled). On top, the RoutingEngine uses predictive location services to predict upcoming traffic while traversing the route - whereas the traffic flow visualization represents only the current point in time.
If you want to visualize the traffic along a route, consider to render multiple colored MapPolyline objects for each span of a section:
// This renders the traffic jam factor on top of the route as multiple MapPolylines per span.
_showTrafficOnRoute(here.Route route) {
  if (route.lengthInMeters / 1000 > 5000) {
    print("Skip showing traffic-on-route for longer routes.");
    return;
  }

  for (var section in route.sections) {
    for (var span in section.spans) {
      TrafficSpeed trafficSpeed = span.trafficSpeed;
      Color? lineColor = _getTrafficColor(trafficSpeed.jamFactor);
      if (lineColor == null) {
        // We skip rendering low traffic.
        continue;
      }
      double widthInPixels = 10;
      MapPolyline trafficSpanMapPolyline = new MapPolyline(span.geometry, widthInPixels, lineColor);
      _hereMapController.mapScene.addMapPolyline(trafficSpanMapPolyline);
      _mapPolylines.add(trafficSpanMapPolyline);
    }
  }
}

// Define a traffic color scheme based on the route's jam factor.
// 0 <= jamFactor < 4: No or light traffic.
// 4 <= jamFactor < 8: Moderate or slow traffic.
// 8 <= jamFactor < 10: Severe traffic.
// jamFactor = 10: No traffic, ie. the road is blocked.
// Returns null in case of no or light traffic.
Color? _getTrafficColor(double? jamFactor) {
  if (jamFactor == null || jamFactor < 4) {
    return null;
  } else if (jamFactor >= 4 && jamFactor < 8) {
    return Color.fromARGB(160, 255, 255, 0); // Yellow
  } else if (jamFactor >= 8 && jamFactor < 10) {
    return Color.fromARGB(160, 255, 0, 0); // Red
  }
  return Color.fromARGB(160, 0, 0, 0); // Black
}
Note that we skip traffic rendering for longer routes due to performance reasons - since in this example each span with traffic is rendered as a separate polyline.
Note
Alternatively, you can show the traffic flow scheme on the map side-by-side with the route's polyine. To ensure that the route is not covering the traffic flow lines, set a measure dependent width based on the current zoom level for MapPolyline and MapArrow.
-
In addition, you can query traffic incidents along the route with the
TrafficEngine. For this, you need to create aGeoCorridorout from the coordinates of aRoute. Make sure to also specify a corridor radius by settinghalfWidthInMeters. Note that theGeoCorridoris limited in length and width. Check the traffic example app to see how to use theTrafficEngine. Check also the Traffic section in this guide. -
If you are only interested in basic traffic incident information along the route, you can get a summary of the traffic situation directly from the
Routeinstance - perSection, by callingSection.getTrafficIncidents(). The resultingTrafficIncidentOnRouteobject contains a small subset of the data that is available with theTrafficEngine, but it can be useful to give a first overview.
In addition to render traffic on route, you can also show the traffic incidents as icons based on the TrafficIncidentType. The following categories are delvered as part of the Route object:
-
accident: Traffic accident. -
congestion: Traffic jam. -
construction: Construction work. -
disabledVehicle: Overturned or broken down vehicle(s) on the road. -
laneRestriction: A lane restriction. -
massTransit: Incident involving mass transit such as rail or subway. -
plannedEvent: Incident involving activities such as sport events or festivals. -
roadClosure: Road closure. -
roadHazard: Dangerous obstruction on the road such as downed tree or traffic light out. -
weather: Adverse weather conditions. -
other: The incident is known but it does't fit into any of the other categories. -
unknown: No specific incident type is provided.
Note that the HERE SDK does not expose such icon assets, but you can enable the trafficIncidents map feature layer to show all incidents with an icon on the map. Similarly, you can also enable a trafficFlow layer to show the general traffic flow on the streets. Take a look at the Traffic section for more details.
Note
You can refresh the traffic information of the route by refreshing the route via refreshRoute(). See the section below.
Find upcoming speed limits and more
The Route object exposes detailed information along a Route to know upcoming speed limits, street attributes and road names, dynamic traffic info and much more.
Take a look at the following attributes: Span.sectionPolylineOffset, Span.dynamicSpeedInfo, Span.streetAttributes, Span.carAttributes, Span.truckAttributes, Span.scooterAttributes, Span.walkAttributes, Span.durationInSeconds, Span.streetNames, Span.routeNumbers, Span.speedLimitInMetersPerSecond, Span.consumptionInKilowattHours, Span.functionalRoadClass, Span.duration, Span.baseDuration. Consult the API Reference for a full list of attributes.
Each attribute is given per span and it is valid for the entire length of a span. Sometimes you will also find segment IDs that indicate a portion of the road network between two intersections. A Span is a route-related concept - it is a portion of the route which has the same attributes. There can be multiple spans on the same segment and each segment usually has a start offset and an end offset.
A Span defines the smallest part of a route segment and its curvature is exposed as a list of GeoCoordinates.
Get toll costs along a route
You can get possible toll costs along the individual sections of a route.
Note
This is a beta release of this feature, so there could be a few bugs and unexpected behaviors. Related APIs may change for new releases without a deprecation process.
The routeOptions.enableTolls flag must be set to get toll costs. It is set to false by default. When this flag is enabled, toll data is requested for toll applicable transport modes as defined in the API Reference.
Get toll costs via section.tolls which provides a PaymentMethod, TollFare & general Toll information.
void _logTollDetails(here.Route route) {
  for (Section section in route.sections) {
    // The spans that make up the polyline along which tolls are required or
    // where toll booths are located.
    List<Span> spans = section.spans;
    List<Toll> tolls = section.tolls;
    if (!tolls.isEmpty) {
      print("Attention: This route may require tolls to be paid.");
    }
    for (Toll toll in tolls) {
      print("Toll information valid for this list of spans:");
      print("Toll system: " + toll.tollSystem);
      print("Toll country code (ISO-3166-1 alpha-3): " + toll.countryCode);
      print("Toll fare information: ");
      for (TollFare tollFare in toll.fares) {
        // A list of possible toll fares which may depend on time of day, payment method and
        // vehicle characteristics. For further details please consult the local
        // authorities.
        print("Toll price: " + tollFare.price.toString() + " " + tollFare.currency);
        for (PaymentMethod paymentMethod in tollFare.paymentMethods) {
          print("Accepted payment methods for this price: " + paymentMethod.toString());
        }
      }
    }
  }
}
Avoid road features
Use AvoidanceOptions to exclude tunnels, highways, low emission zones (LEZ), areas, ferries, toll costs and other road features, like harsh turns. You can pass a list of RoadFeatures, ZoneCategory, GeoBox, CountryCode elements and more.
RoadFeatures contains road specific features like tunnels or toll roads. For example, to exclude all highways from your journey, add controlledAccessHighway to the list of features.
AvoidanceOptions can be set together with other route options including localization and unit options to the options for the desired transport mode. For example, for car, use CarOptions, for trucks, TruckOptions and so on. These options are then read when calculating a route and in case of AvoidanceOptions, the engine will try to avoid the listed features.
If it is not possible to avoid the set options, for example, when a route starts in a blocked area, you can inspect such violations in the provided SectionNotice elements. If these are set, you can decide to reject such a route.
Refresh routes
The traffic flow information contained in a Route object is valid for the time when the route was calculated, see above. If you want to update this information at any later point in time, you can refresh the route.
It is also possible to refresh the route options for a route:
RefreshRouteOptions refreshRouteOptions = RefreshRouteOptions.withTaxiOptions(taxiOptions);

// Update the route options and set a new start point on the route.
// The new starting point must be on or very close to the original route, preferrably, use a map-matched waypoint if possible.
// Note: A routeHandle is only available, when RouteOptions.enableRouteHandle was set to true when the original route was calculated.
routingEngine.refreshRoute(route.routeHandle, mapMatchedWaypoint, refreshRouteOptions, (routingError, routes) {
    if (routingError == null) {
        HERE.Route newRoute = routes.first;
        // ...
    } else {
        // Handle error.
    }
});
For this you need to know the RouteHandle, which must be requested via RouteOptions.enableRouteHandle before the route was calculated.
In addition, refreshing a route can be useful to convert the route options from one transport type to another or to update specific options. If the conversion is not possible - for example, when a pedestrian route is converted to a truck route, then a routingError indicates this.
You can also shorten the route, by specifying a new starting point. The new starting point must be very close to the original route as no new route is calculated. If the new starting point is too far away, then a routingError occurs.
Note that refreshing a route is not enough when a driver deviates from a route during an ongoing turn-by-turn navigation - as the detour part needs a new route calculation. In such a case, it may be more useful to recalculate the whole route by setting a new starting point - or to use the returnToRoute() method that allows to keep the originally chosen route alternative.
Return to a route
The RoutingEngine allows to refresh an existing route (see above) based on the current traffic situation. The result may be a new route that is faster than the previous one. However, the new startingPoint must be very close to the original route.
If you need to handle a case where the startingPoint is farther away from the route, consider to use the returnToRoute() feature of the RoutingEngine. For example, a driver may decide to take a detour due to the local traffic situation. Calling returnToRoute() will also result in a new route, but it will try to resemble as much as possible from the original route without a costly route recalculation - if possible.
- Stopover waypoints are guaranteed to be passed by.
- Pass-through waypoints are only meant to shape the route, so there is no guarantee that the new route will honor or discard them.
- The current traffic situation is taken into account and may reshape the route.
Note that turn-by-turn navigation is only available for the Navigate Edition.
Import routes from other services
Note
This is a beta release of this feature, so there could be a few bugs and unexpected behaviors. Related APIs may change for new releases without a deprecation process.
You can import routes from other APIs and/or vendors via one of the various overloaded routingEngine.importRoute() methods. Note that this is not a 1:1 import feature, but rather a reconstruction.
A new Route object can be created from:
- Option 1: A list of
GeoCoordinatesandRouteOptions. This can be useful, when the route should be imported from a different vendor or when the route should be persisted for a longer time. The route shape will be kept as close as possible to the one provided. Requires an online connection. - Option 2: A
RouteHandle. This can be useful to import a route from other HERE services. A possible use case can be to create a route on the HERE WeGo website or another web page that uses the HERE REST APIs and then transfer it to a mobile device to start a trip. Note that a map update on backend side or other changes in the real world can lead to an invalid handle. Also, the lifetime of the handle is in general limited. Therefore, it is recommended to use the handle only for a few hours. Although theRouteHandleencodes certain information, it requires an online connection to get the full route data from backend.
Any AvoidanceOptions that are applied may be discarded and reported as violations via the route's Section.sectionNotices. For example, if you request to avoid highways, but the provided coordinates match to a highway road, then the resulting route will still match the highway, but a notice is added to indicate that the desired avoidance option is violated.
In general, be aware that importing a route may not always reproduce exactly the same route as the original one - even if you use the exact same RouteOptions. There can be always changes in the map, for example, due to a new construction site or related traffic events. Also, the map data itself can change, for example, when speed limits change along a road or new roads are built or existing ones closed. Also, the time of the departure can influence if certain roads can be taken or not.
Below we look more into the details.
Option 1: Import Routes from a List of Geographic Coordinates
To import a route from a list of GeoCoordinates with RouteOptions, a list of GeoCoordinates is needed that define the route shape. Such coordinates need to be very close to each other, or the calculation will fail. Such a list of coordinates can be extracted from a route calculated by a different vendor or it can be extracted from a GPX trace.
// Import a route from list of Location instances.
// Note that the geographic coordinates need to be close to each other.
List<Location> routeLocations = [
  Location.withCoordinates(GeoCoordinates(52.518032, 13.420632)),
  Location.withCoordinates(GeoCoordinates(52.51772, 13.42038)),
  Location.withCoordinates(GeoCoordinates(52.51764, 13.42062)),
  Location.withCoordinates(GeoCoordinates(52.51754, 13.42093)),
  Location.withCoordinates(GeoCoordinates(52.51735, 13.42155)),
  Location.withCoordinates(GeoCoordinates(52.51719, 13.42209)),
  Location.withCoordinates(GeoCoordinates(52.51707, 13.42248)),
  Location.withCoordinates(GeoCoordinates(52.51695, 13.42285)),
  Location.withCoordinates(GeoCoordinates(52.5168, 13.42331)),
  Location.withCoordinates(GeoCoordinates(52.51661, 13.42387)),
  Location.withCoordinates(GeoCoordinates(52.51648, 13.42429)),
  Location.withCoordinates(GeoCoordinates(52.51618, 13.42513)),
  Location.withCoordinates(GeoCoordinates(52.5161, 13.42537)),
  Location.withCoordinates(GeoCoordinates(52.51543, 13.42475)),
  Location.withCoordinates(GeoCoordinates(52.51514, 13.42449)),
  Location.withCoordinates(GeoCoordinates(52.515001, 13.424374))];

routingEngine.importCarRoute(routeLocations, CarOptions(), (routingError, routes) {
  if (routingError == null) {
    HERE.Route newRoute = routes!.first;
    // ...
  } else {
    // Handle error.
  }
});
For this option, you can select the overload of the importRoute() method that matches your desired transport type.
When importing a route from a list of GeoCoordinates and RouteOptions then the RoutingEngine will create the route shape as closely as possible from the provided geographic coordinates.
For best results use 1Hz GPS data, or points that have a spacing of a few meters. Very sparse data may result in an error.
The list of coordinates is not unlimited: Please refer to the API Reference for the maximum number of supported items. Similarly, the list of waypoints is not unlimited.
Note
This feature requires to map-match all provides points to a street. Therefore, it may be considerably slower than importing a (longer) route from a RouteHandle.
Option 2: Import routes from a RouteHandle
Below we take a look into the RouteHandle option. With the RouteHandle(String handle) constructor you can create a RouteHandle from a given string handle. Such a string can be provided from other backend sources such as one of the available HERE REST APIs. Note that the string is only valid for a couple of hours.
Below you can find an example REST API call to create a route with a route handle string (replace YOUR_API_KEY with the actual key you have in use):
You can copy the route handle string from the JSON response and use it with the HERE SDK like so:
// Import a route from RouteHandle.
routingEngine.importRouteFromHandle(RouteHandle("routeHandleStringFromBackend"), RefreshRouteOptions.withCarOptions(CarOptions()), (routingError, routes) {
  if (routingError == null) {
    HERE.Route newRoute = routes!.first;
    // ...
  } else {
    // Handle error.
  }
});
The RouteHandle string identifies an already calculated route. Once imported successfully, a new Route object is created and provided as part of the CalculateRouteCallback for further use with the HERE SDK.
Show reachable area
With isoline routing you can generate polygons to represent the area of reach from a given point based on time, distance or energy consumption: The polygon will encompass all destinations that can be reached in a specific amount of time, a maximum travel distance, or even the charge level available at an electric vehicle.
Note
Isoline routing considers real-time and historical traffic in its calculations.
Some examples of how this could be useful:
- Users can find restaurants within a 2 km walking distance from their current location.
- Users can search for hotels based on the distance to sights, for example, to find hotels within a 20 minute drive to major attractions - such as Disney World and Universal Studios in Orlando, Florida USA.
Below we show a consumption based Isoline example for an electric vehicle scenario, where the driver wants to know which points are reachable within the provided limit of 400 Wh: So, the goal is to consume 400 Wh or less - and the question is: What can the driver reach within this energy limit?
Note
Electric vehicles have a limited reachable range based on their current battery charge and factors affecting the rate of energy consumed, such as road slope or auxiliary power usage. Therefore, it is useful to visualize the appropriate range to avoid running out of energy before reaching a charging point. Since vehicles have unique consumption parameters, they are to be specified in the request for an accurate range to be calculated. For more details, see the electric vehicle section below.
The result will be a GeoPolygon shape that you can show on the map to provide the driver a visual orientation:
// This finds the area that an electric vehicle can reach by consuming 400 Wh or less,
// while trying to take the fastest possible route into any possible straight direction from start.
// Note: We have specified evCarOptions.routeOptions.optimizationMode = OptimizationMode.FASTEST for EV car options above.
List<int> rangeValues = [400];

// With null we choose the default option for the resulting polygon shape.
int? maxPoints;
IsolineOptionsCalculation calculationOptions = IsolineOptionsCalculation.withNoDefaults(
    IsolineRangeType.consumptionInWattHours, rangeValues, IsolineCalculationMode.balanced, maxPoints, RoutePlaceDirection.departure);
IsolineOptions isolineOptions = IsolineOptions.withEVCarOptions(calculationOptions, _getEVCarOptions());

_routingEngine.calculateIsoline(Waypoint(_startGeoCoordinates!), isolineOptions,
    (RoutingError? routingError, List<Isoline>? list) {
  if (routingError != null) {
    _showDialog("Error while calculating reachable area:", routingError.toString());
    return;
  }

  // When routingError is nil, the isolines list is guaranteed to contain at least one isoline.
  // The number of isolines matches the number of requested range values. Here we have used one range value,
  // so only one isoline object is expected.
  Isoline isoline = list!.first;

  // If there is more than one polygon, the other polygons indicate separate areas, for example, islands, that
  // can only be reached by a ferry.
  for (GeoPolygon geoPolygon in isoline.polygons) {
    // Show polygon on map.
    Color fillColor = Color.fromARGB(128, 0, 143, 138);
    MapPolygon mapPolygon = MapPolygon(geoPolygon, fillColor);
    _hereMapController.mapScene.addMapPolygon(mapPolygon);
    _mapPolygons.add(mapPolygon);
  }
});
This finds the area that an electric vehicle can reach by consuming 400 Wh or less, while trying to take the fastest possible route into any possible straight direction from start.
Why fastest? This depends on the route's optimization mode (we have shown in earlier sections above) - of course, you can specify any mode. Note that each isoline needs exactly one center point from where a journey may start.
Since we are interested in the energy consumption, we also provided EVCarOptions. These options must include battery specifications as shown in the electric vehicle routing section below. If you provide a time or distance limit instead as range type, you can provide the usual route options as shown earlier.
The IsolineRangeType defines the type of the provide range value. Here we use 400. You can provide multiple values - and as a result you would then get multiple Isoline objects - one for each provided range value.
On the other hand, each Isoline object can contain multiple polygons for special cases, such as when the area of reach includes an island. Such areas are provided as separate polygons.
The shape of the resulting polygon can be defined by the maxPoints parameter. It determines the number of vertices of the GeoPolygon. Note that this parameter does not influence the actual calculation of the polygon, but just its apearance.
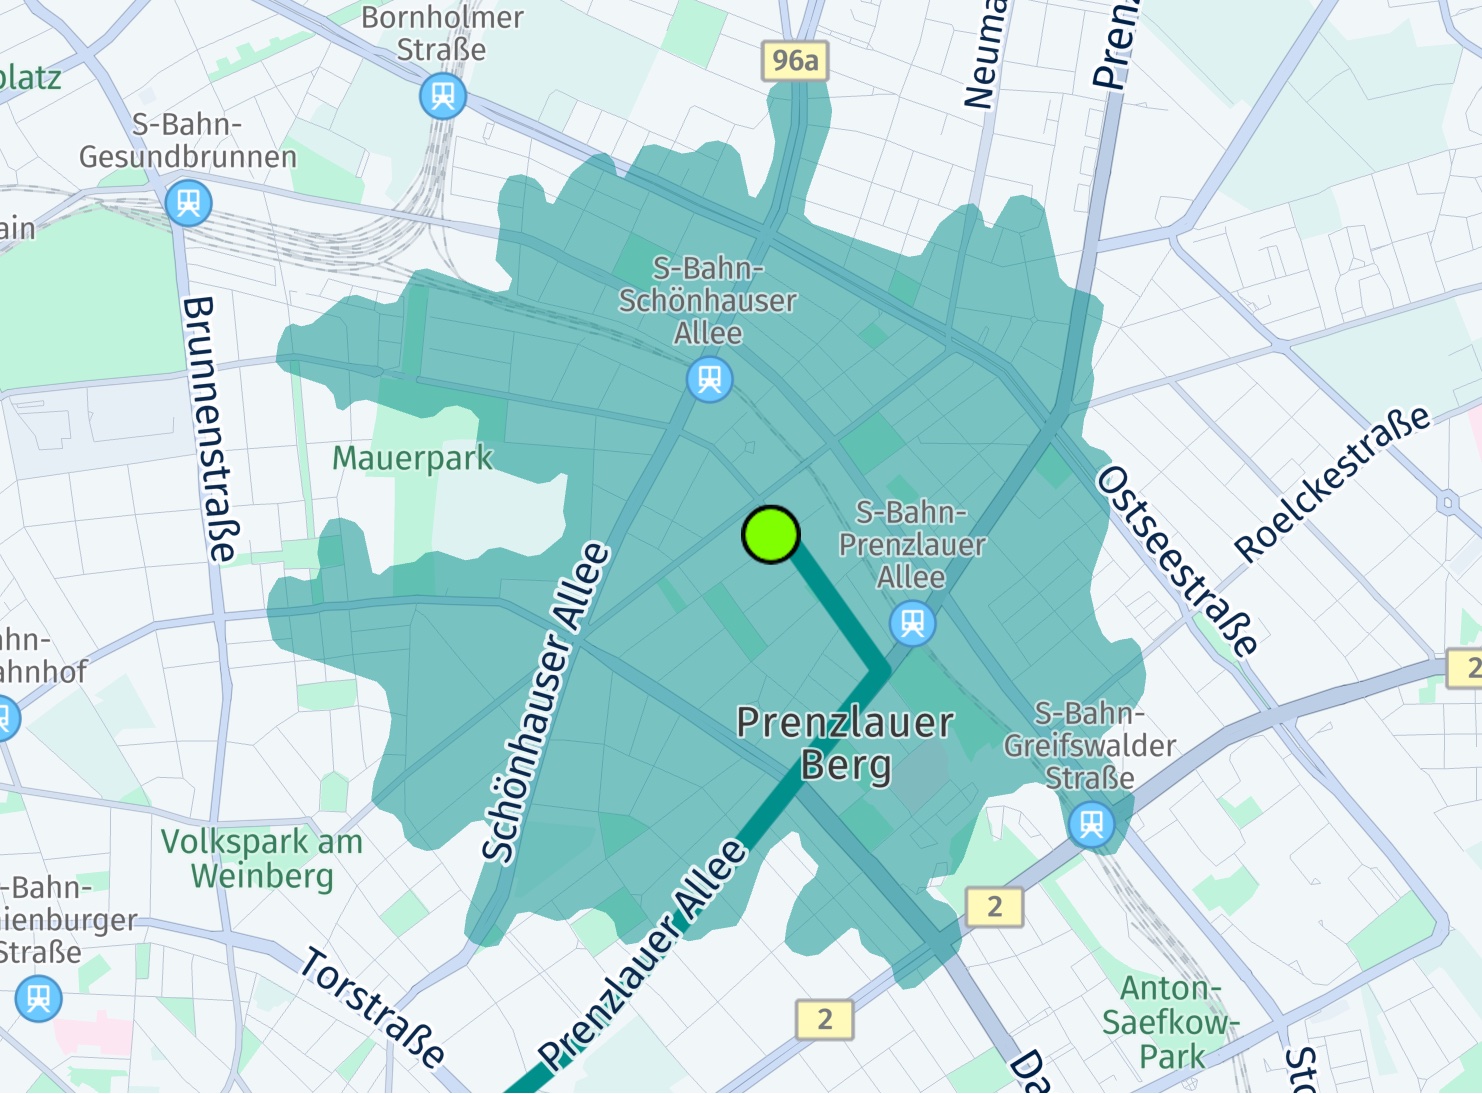
The screenshot shows the center location of the polygon, indicated by a big green circle. It also shows a possible route beyond this area with two additional found charging stations along the route. In the next section you can find how to calculate routes for electric vehicles.
Note
You can find the above code snippet as part of the ev_routing_app example on GitHub.
Get road shield icons for maneuver preview
With iconProvider.createRoadShieldIcon(...) you can asynchronously create a Bitmap that depicts a road number such as "A7" or "US-101" - as it already appears on the map view.
The creation of road shield icons happens offline and does not require an internet connection. The data you need to create the icons is taken solely from the Route itself, but can be filled out also manually.
![]()
In the Devloper Guide for the Navigate Edition you can find a usage example during a turn-by-turn example in the Guidance section. Take also a look at the Rerouting example app on GitHub. Note that it requires the Naviate Edition, but the code for the IconProvider can be also used by other editions, for example, to show road shield icons as part of a route preview.
Get routes for electric vehicles
Electric vehicle (EV) usage and sales continue growing around the world. How can HERE help to provide the best routes for electric vehicles?
-
HERE EV Routing delivers optimized routes for EVs to get from A to B, minimizing the number of charging stops and optimizing battery charge times (based on the vehicle’s consumption model). It also takes into account a number of factors when planning trips, including topography, road geometry, real-time traffic information and traffic patterns.
-
Instead of searching for charging stations along the route, HERE analyzes the charging time at every possible station and chooses the most appropriate combination that will deliver the shortest driving and charging times.
Getting EV routes is simple. Similar to getting car or truck routes, for EV routing you just need to add electric vehicle specific route options. This way you can get routes for electric vehicles in the same way as for other transport modes. Just specify EVRouteOptions and add them to the calculateRoute() method:
_routingEngine.calculateEVCarRoute(waypoints, _getEVCarOptions(),
    (RoutingError? routingError, List<here.Route>? routeList) {
  if (routingError == null) {
    // When error is null, then the list guaranteed to be not null.
    here.Route route = routeList!.first;
    // Use routes from list.
  } else {
    var error = routingError.toString();
    _showDialog('Error', 'Error while calculating a route: $error');
  }
});
By default, EVRouteOptions will not include the required parameters to ensure that a destination can be reached without running out of energy.
To ensure this, you need to set the required parameters that may add charging stations to the route - while still optimizing the result for overall travel time.
Below you can see an example how to create such options:
EVCarOptions _getEVCarOptions() {
  EVCarOptions evCarOptions = EVCarOptions();

  // The below three options are the minimum you must specify or routing will result in an error.
  evCarOptions.consumptionModel.ascentConsumptionInWattHoursPerMeter = 9;
  evCarOptions.consumptionModel.descentRecoveryInWattHoursPerMeter = 4.3;
  evCarOptions.consumptionModel.freeFlowSpeedTable = {0: 0.239, 27: 0.239, 60: 0.196, 90: 0.238};

  // Must be 0 for isoline calculation.
  evCarOptions.routeOptions.alternatives = 0;

  // Ensure that the vehicle does not run out of energy along the way
  // and charging stations are added as additional waypoints.
  evCarOptions.ensureReachability = true;

  // The below options are required when setting the ensureReachability option to true
  // (AvoidanceOptions need to be empty).
  evCarOptions.avoidanceOptions = AvoidanceOptions();
  evCarOptions.routeOptions.speedCapInMetersPerSecond = null;
  evCarOptions.routeOptions.optimizationMode = OptimizationMode.fastest;
  evCarOptions.batterySpecifications.connectorTypes = [
    ChargingConnectorType.tesla,
    ChargingConnectorType.iec62196Type1Combo,
    ChargingConnectorType.iec62196Type2Combo
  ];
  evCarOptions.batterySpecifications.totalCapacityInKilowattHours = 80.0;
  evCarOptions.batterySpecifications.initialChargeInKilowattHours = 10.0;
  evCarOptions.batterySpecifications.targetChargeInKilowattHours = 72.0;
  evCarOptions.batterySpecifications.chargingCurve = {0.0: 239.0, 64.0: 111.0, 72.0: 1.0};

  // Note: More EV options are available, the above shows only the minimum viable options.
  return evCarOptions;
}
Here we define the EVConsumptionModel to specify the energy consumption model of the electric vehicle. We also add BatterySpecifications. With these options, additional charging stations may be inserted into the route as additional stopovers - which means that the route will be split into more sections depending on the number of inserted charging stations.
Note
If you want to include such required charging stations, it is also mandatory to use OptimizationMode.FASTEST. You also need to set ensureReachability to true. When ensureReachability is activated, the route may be adjusted so that required charging stations are along the resulting path and the required charging stations are added as WayPoint items to the route.
All options can influence the time it takes to calculate a route for electric vehicles. Most importantly, a large battery capacity - as set with totalCapacityInKilowattHours - can decrease the need for charging stops - as well as a fully loaded battery when starting the trip - see initialChargeInKilowattHours: A relatively low value means that the route must include charging stations near the beginning. Otherwise, the route calculation may even fail.
Currently, the engine will only include charging stations that are in service. Charging stations that our out-of-service or in maintenance are not considered. However, due to the dynamic situation at charging stations, the engine does not consider if a station is currently occupied or reserved. So, in worst case, it can happen that you arrive at a station and it is currently being used to charge another car.
Note that we also specify the available battery connector types, so that charging stations that do not provide a compatible connector to charge the car will be excluded.
Note
Usually, you can take the consumption and battery information from the car itself or consult the manual or your car manufacturer directly. Note that not all information may be available to you and some information may be only exclusively known by the manufacturer. Either way, the route calculation process will take the provided specifications into account and missing values will be filled with suitable default values.
Especially for longer journeys with electric vehicles, it is important to plan for charging stops along the way. After all, charging stations are much less common than gas stations. With the above options, the RoutingEngine tries to find the fastest route, i.e., one with the lowest overall time consumed to reach the destination, while ensuring that the vehicle does not run out of energy along the way.
The result of the calculation is a route optimized for electric vehicles - instead of just adding any charging stations found along the way - as we have shown in the Search Along a Route section.
Once the route is calculated, you can gather more useful information. The code snippet shown below will log the estimated energy consumption per Section and list the actions you need to take in order to charge the battery - if needed:
void _logEVDetails(here.Route route) {
  // Find inserted charging stations that are required for this route.
  // Note that this example assumes only one start waypoint and one destination waypoint.
  // By default, each route has one section.
  int additionalSectionCount = route.sections.length - 1;
  if (additionalSectionCount > 0) {
    // Each additional waypoint splits the route into two sections.
    print("EVDetails: Number of required stops at charging stations: " + additionalSectionCount.toString());
  } else {
    print(
        "EVDetails: Based on the provided options, the destination can be reached without a stop at a charging station.");
  }

  int sectionIndex = 0;
  List<Section> sections = route.sections;
  for (Section section in sections) {
    EVDetails? evDetails = section.evDetails;
    if (evDetails == null) {
      print("No EVDetails found.");
      return;
    }
    print("EVDetails: Estimated net energy consumption in kWh for this section: " +
        evDetails.consumptionInKilowattHour.toString());
    for (PostAction postAction in section.postActions) {
      switch (postAction.action) {
        case PostActionType.chargingSetup:
          print("EVDetails: At the end of this section you need to setup charging for " +
              postAction.duration.inSeconds.toString() +
              " s.");
          break;
        case PostActionType.charging:
          print("EVDetails: At the end of this section you need to charge for " +
              postAction.duration.inSeconds.toString() +
              " s.");
          break;
        case PostActionType.wait:
          print("EVDetails: At the end of this section you need to wait for " +
              postAction.duration.inSeconds.toString() +
              " s.");
          break;
        default:
          throw ("Unknown post action type.");
      }
    }

    print("EVDetails: Section " +
        sectionIndex.toString() +
        ": Estimated battery charge in kWh when leaving the departure place: " +
        section.departurePlace.chargeInKilowattHours.toString());
    print("EVDetails: Section " +
        sectionIndex.toString() +
        ": Estimated battery charge in kWh when leaving the arrival place: " +
        section.arrivalPlace.chargeInKilowattHours.toString());

    // Only charging stations that are needed to reach the destination are listed below.
    ChargingStation? depStation = section.departurePlace.chargingStation;
    if (depStation != null && depStation.id != null && !chargingStationsIDs.contains(depStation.id)) {
      print("EVDetails: Section " + sectionIndex.toString() + ", name of charging station: " + depStation.name.toString());
      chargingStationsIDs.add(depStation.id.toString());
      _addCircleMapMarker(section.departurePlace.mapMatchedCoordinates, "assets/required_charging.png");
    }

    ChargingStation? arrStation = section.departurePlace.chargingStation;
    if (arrStation != null && arrStation.id != null && !chargingStationsIDs.contains(arrStation.id)) {
      print("EVDetails: Section " + sectionIndex.toString() + ", name of charging station: " + arrStation.name.toString());
      chargingStationsIDs.add(arrStation.id.toString());
      _addCircleMapMarker(section.arrivalPlace.mapMatchedCoordinates, "assets/required_charging.png");
    }

    sectionIndex += 1;
  }
}
Note that postAction.duration.inSeconds provides the estimated time it takes to charge the battery. This time is included in the overall route calculation and the estimated time of arrival (ETA).
Below is a screenshot of how a resulting route may look.
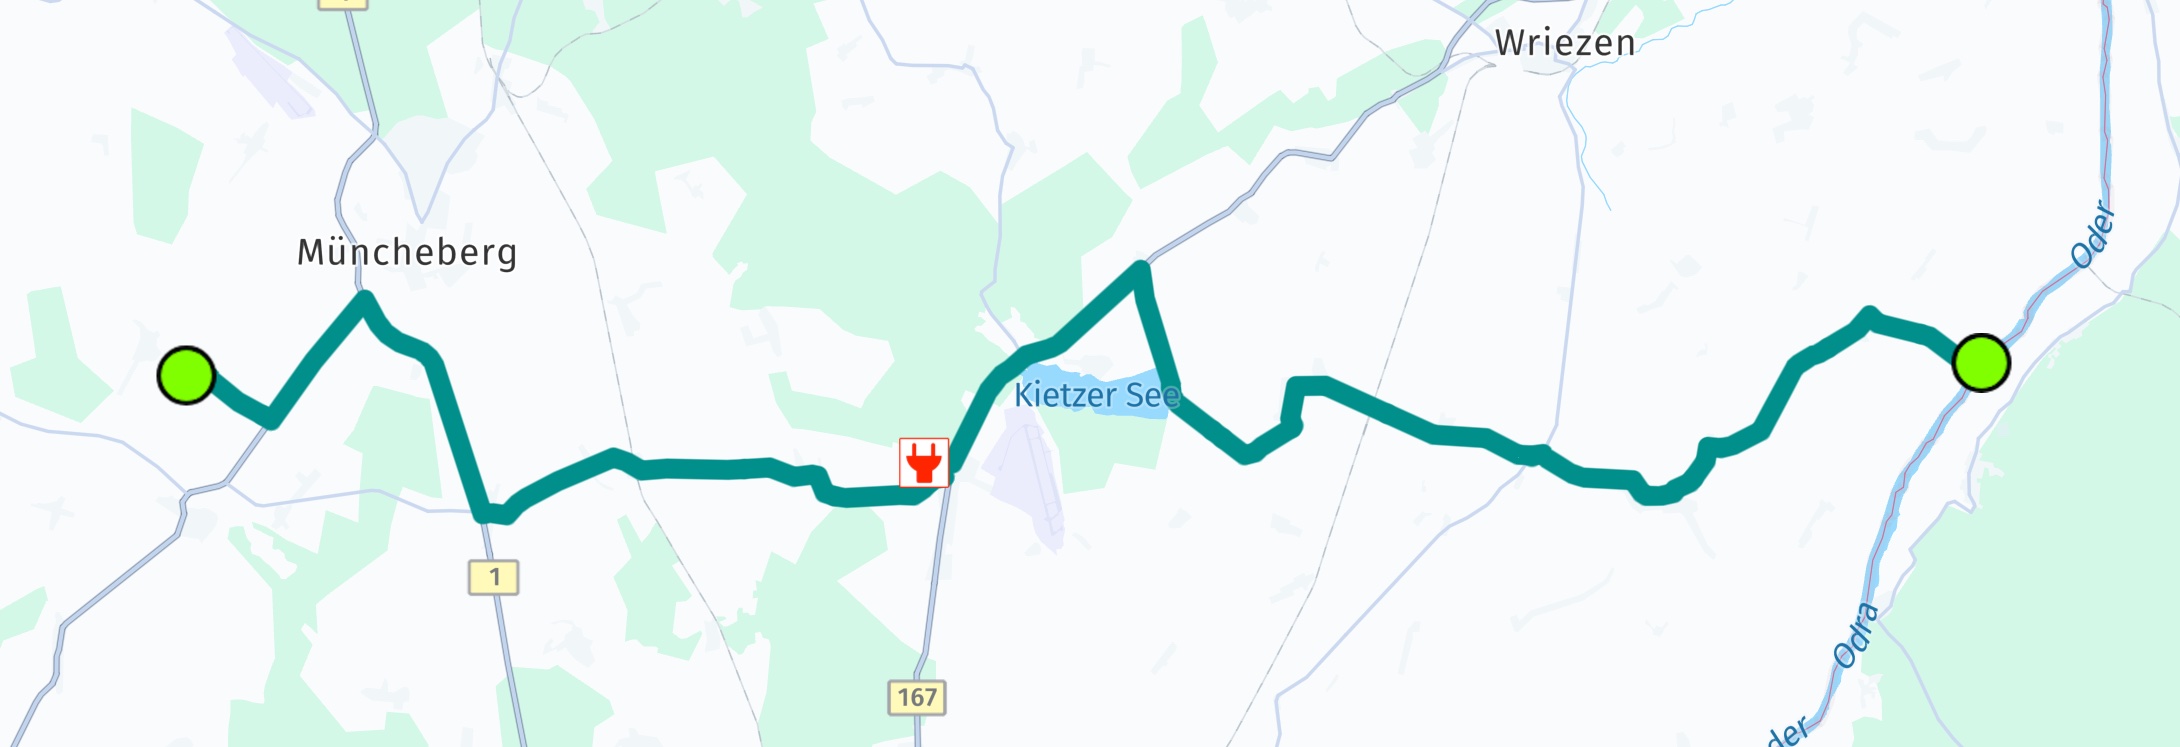
Here you can see that the route required two stops at a charging station - indicated by red markers. The route contains three sections as each charging station splits the route - when inserting additional waypoints.
The first section includes a post action which describes the charging stop. It contains the information on the expected arrival charge among other information.
Unless specified otherwise, the energy consumption is assumed to be in Wh.
Finding charging stations
With the online SearchEngine you can search for EVChargingStation connectors that are part of a EVChargingPool. A charging pool for electric vehicles is an area equipped with one or more charging stations.
Use PlaceCategory.businessAndServicesEVChargingStation to find pools. In the Details of a Place result you can find the list of found pools containing stations, if any.
You can also search for stations with the OfflineSearchEngine, if this engine is supported by your edition of the HERE SDK.
Note
This search feature requires a license for use with the online SearchEngine. For use with the OfflineSearchEngine, no license is required. Please contact us to receive access. If your credentials are not enabled, a SearchError.FORBIDDEN error will indicate the missing license.
Note that this is a beta release of this feature, so there could be a few bugs and unexpected behaviors. Related APIs may change for new releases without a deprecation process.
Define the consumption model
The following parameters define a consumption model to get more accurate results for electric vehicles:
- ascentConsumptionInWattHoursPerMeter: Rate of energy consumed per meter rise in elevation.
- descentRecoveryInWattHoursPerMeter: Rate of energy recovered per meter fall in elevation.
- freeFlowSpeedTable: Function curve specifying consumption rate at a given free flow speed on a flat stretch of road.
- trafficSpeedTable: Function curve specifying consumption rate at a given speed under traffic conditions on a flat stretch of road.
- auxiliaryConsumptionInWattHoursPerSecond: Rate of energy consumed by the vehicle's auxiliary systems (e.g., air conditioning, lights) per second of travel.
A consumption speed table defines the energy consumption rate when the vehicle travels on a straight road without elevation change at a given speed in km/h. It represents a piecewise linear function.
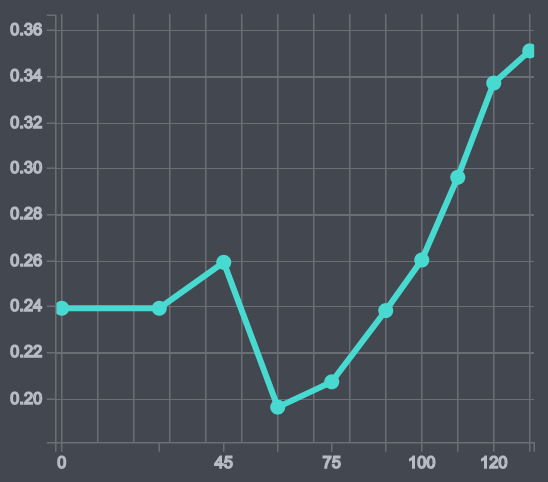
Here is an example of a free flow speed list. On the left you see the speed and on the right, consumption:
- 0: 0.239
- 27: 0.239
- 45: 0.259
- 60: 0.196
- 75: 0.207
- 90: 0.238
- 100: 0.26
- 110: 0.296
- 120: 0.337
- 130: 0.351
In a graph it will look like this:
You can specify two different consumption speed tables - free flow speed table and traffic speed tables:
- Free flow speed: Describes the energy consumption when travelling at constant speed.
- Traffic speed: Describes the energy consumption when travelling under heavy traffic conditions, for example, when the vehicle is expected to often change the travel speed at a given average speed.
If a trafficSpeedTable is not provided then only the freeFlowSpeedTable is used for calculating speed-related energy consumption.
Note
You can find an ev_routing_app example app on GitHub.